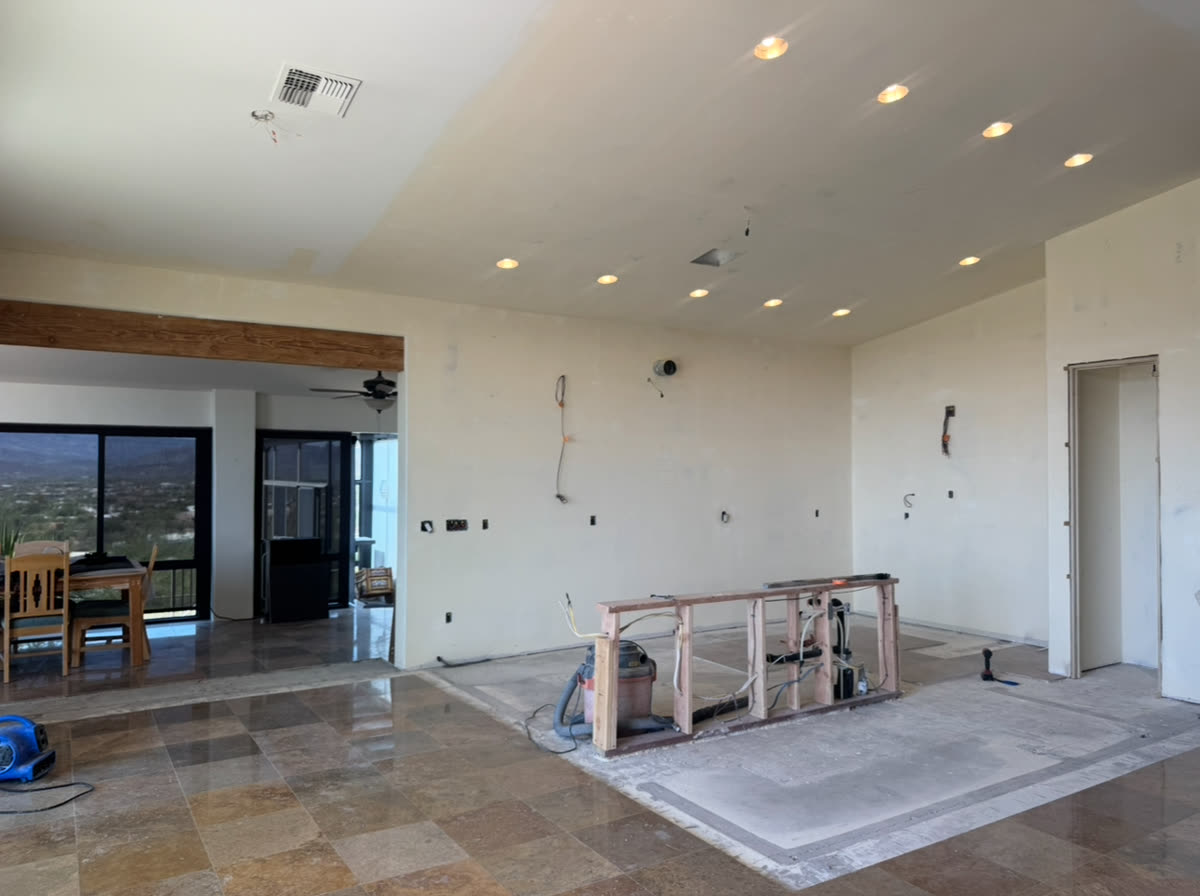
We took the original golden-oak cabinets out of a 1980s Sun City West kitchen and hung a full run of white Shaker boxes in their place, over two site days, without the sink or the countertop ever going out of service. The cabinets were client-supplied. Our part was demo, layout, hanging, fillers, doors, and hardware. Labor for a job this size in the Phoenix metro runs about $100 to $300 a box, which puts eight boxes near $800 to $2,400 and fourteen near $1,400 to $4,200, plus demo and wall repair. Below is how the install ran, and what it means if you're pricing kitchen cabinet installation in Phoenix or the West Valley.
This one came through a local property manager who runs about a hundred rentals in the Sun City area and needed a tired kitchen turned around between tenants. That changes the job. The budget is a landlord's budget and the timeline is a vacancy timeline, and nobody wants to live without a kitchen sink for a week. Those constraints shaped every decision below, and they're the same constraints a lot of West Valley homeowners are working with when they call us.
Project at a Glance
- Location: A single-story 1980s home in Sun City West, AZ, managed as a rental
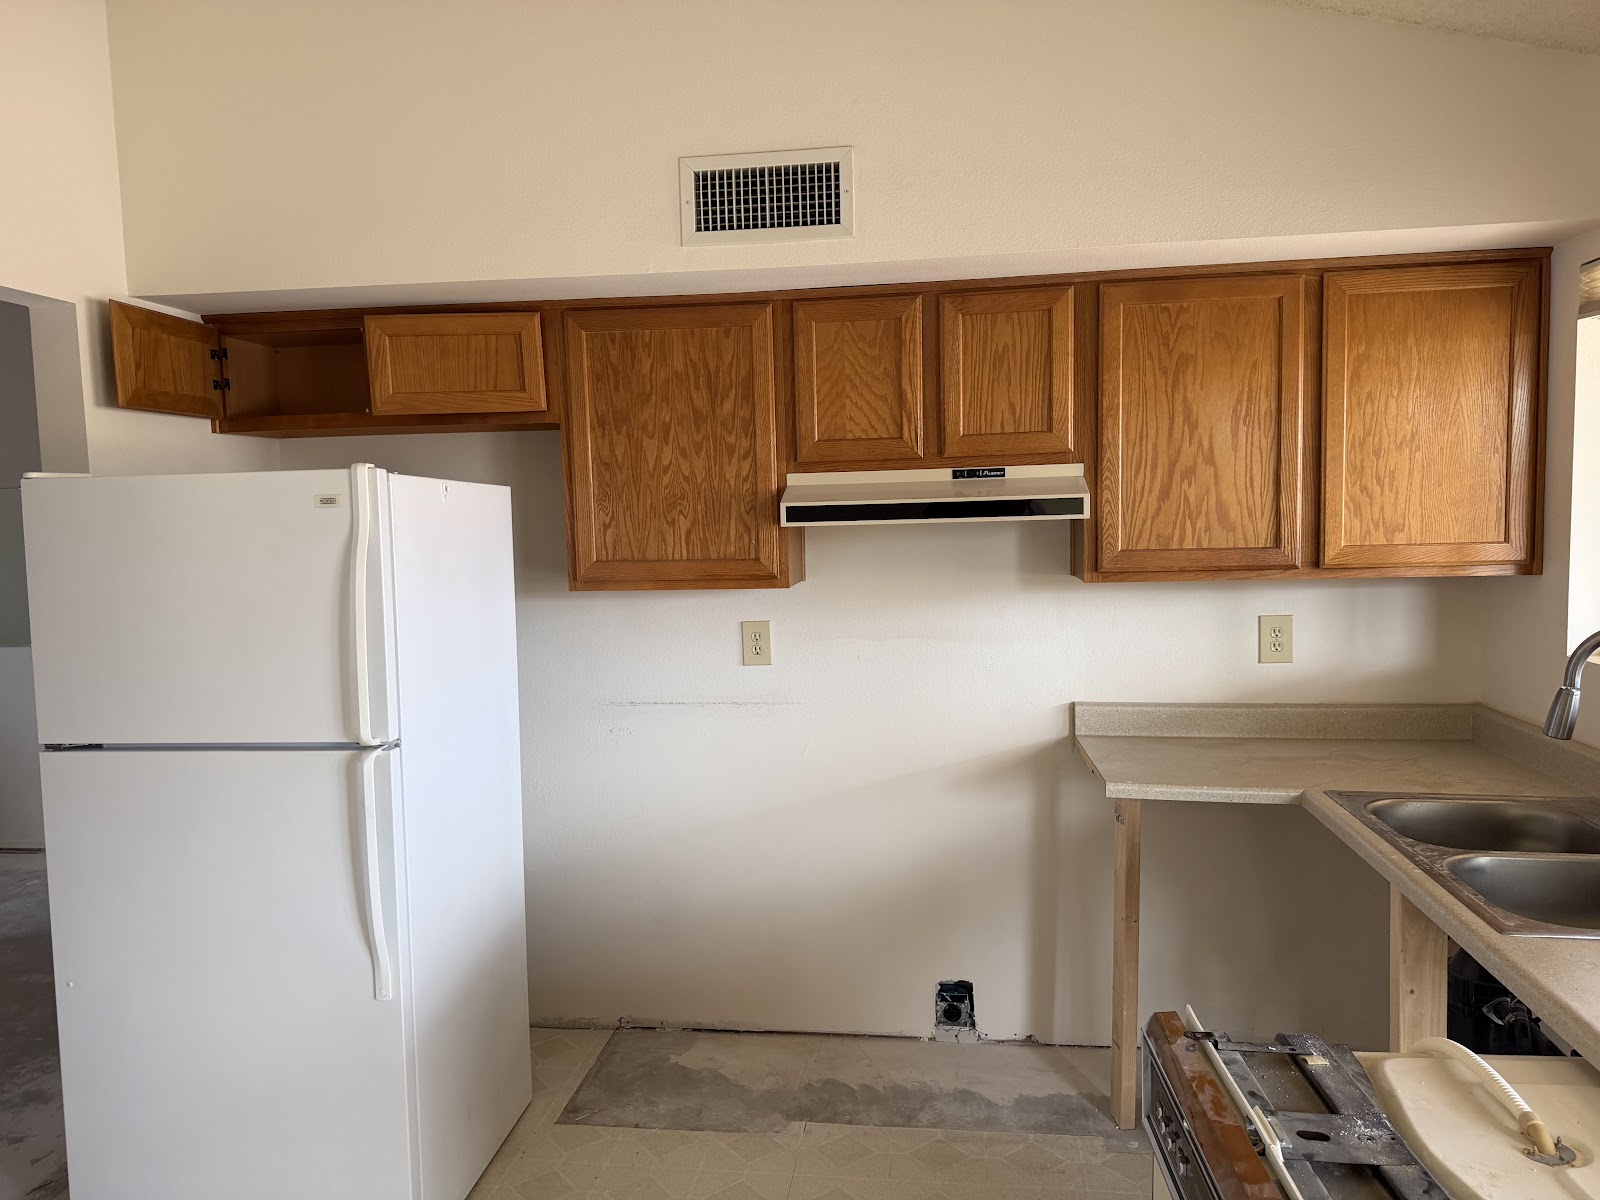
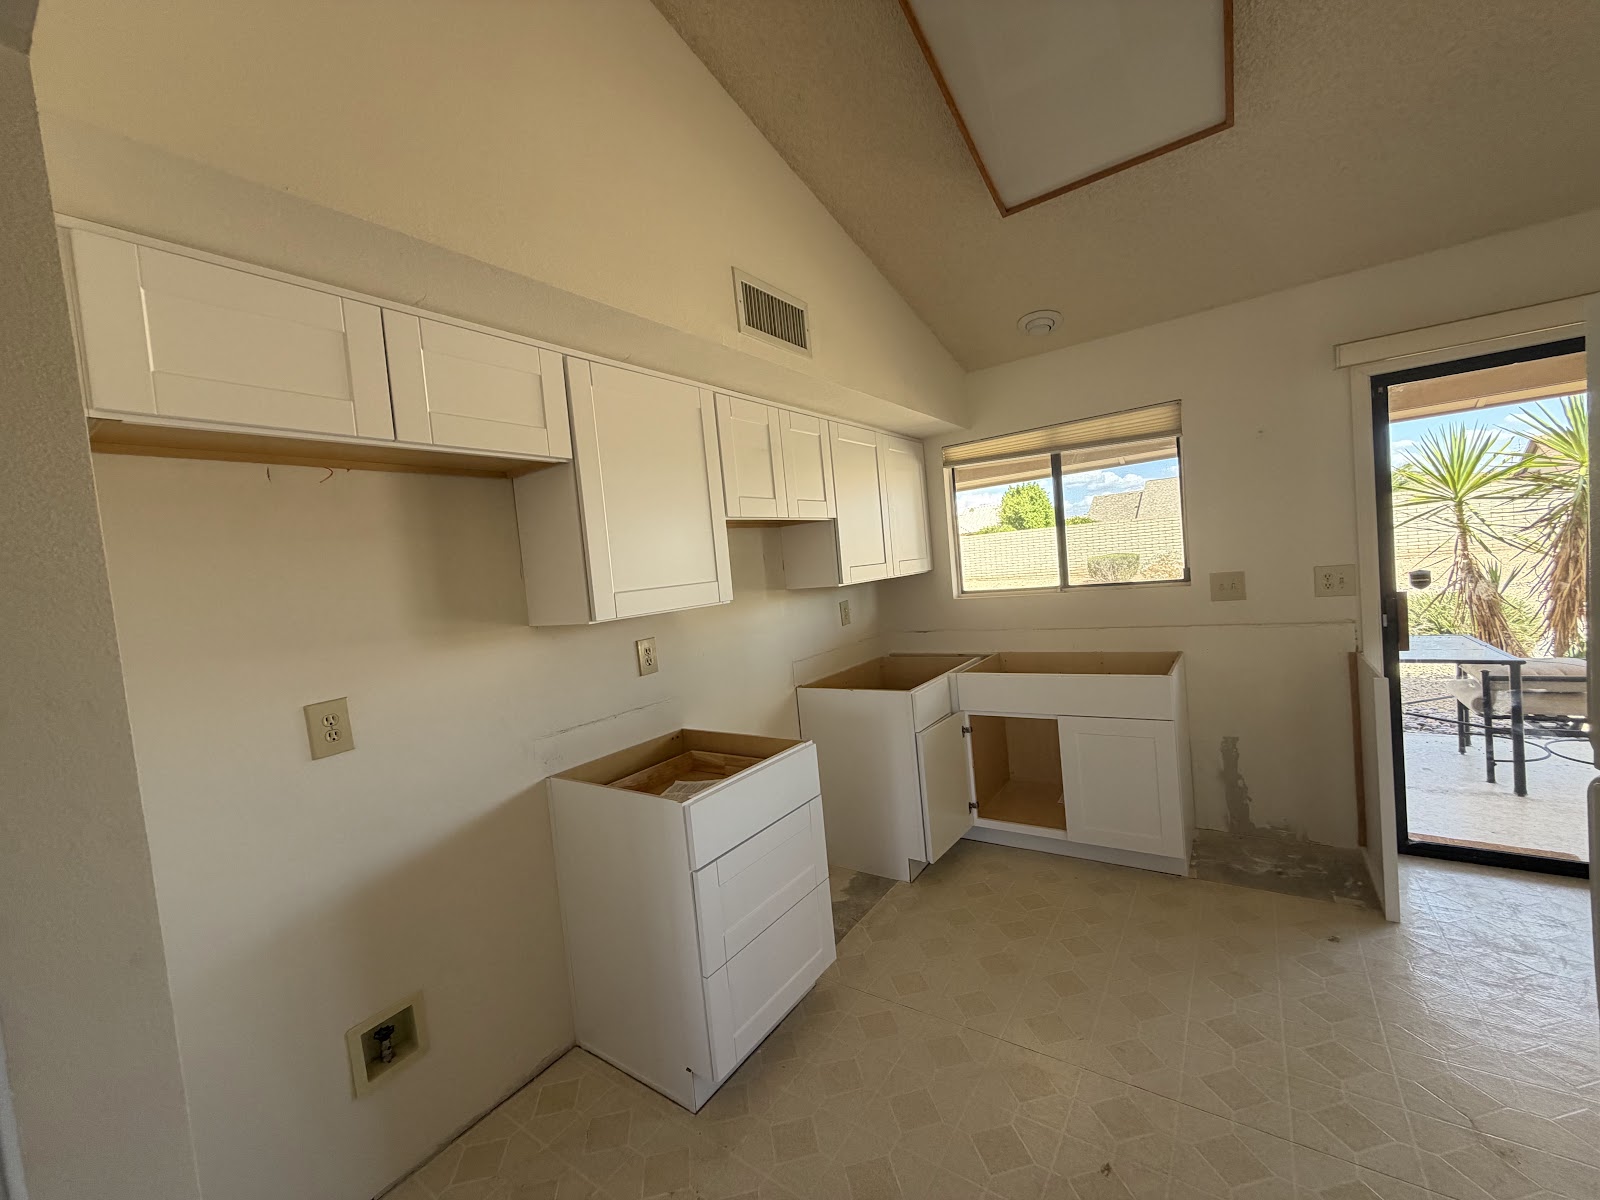
- The kitchen: Original golden-oak uppers and bases, a post-form laminate counter, a double stainless sink with a disposal, a 30-inch range with a hood, and diamond-pattern sheet vinyl on the floor
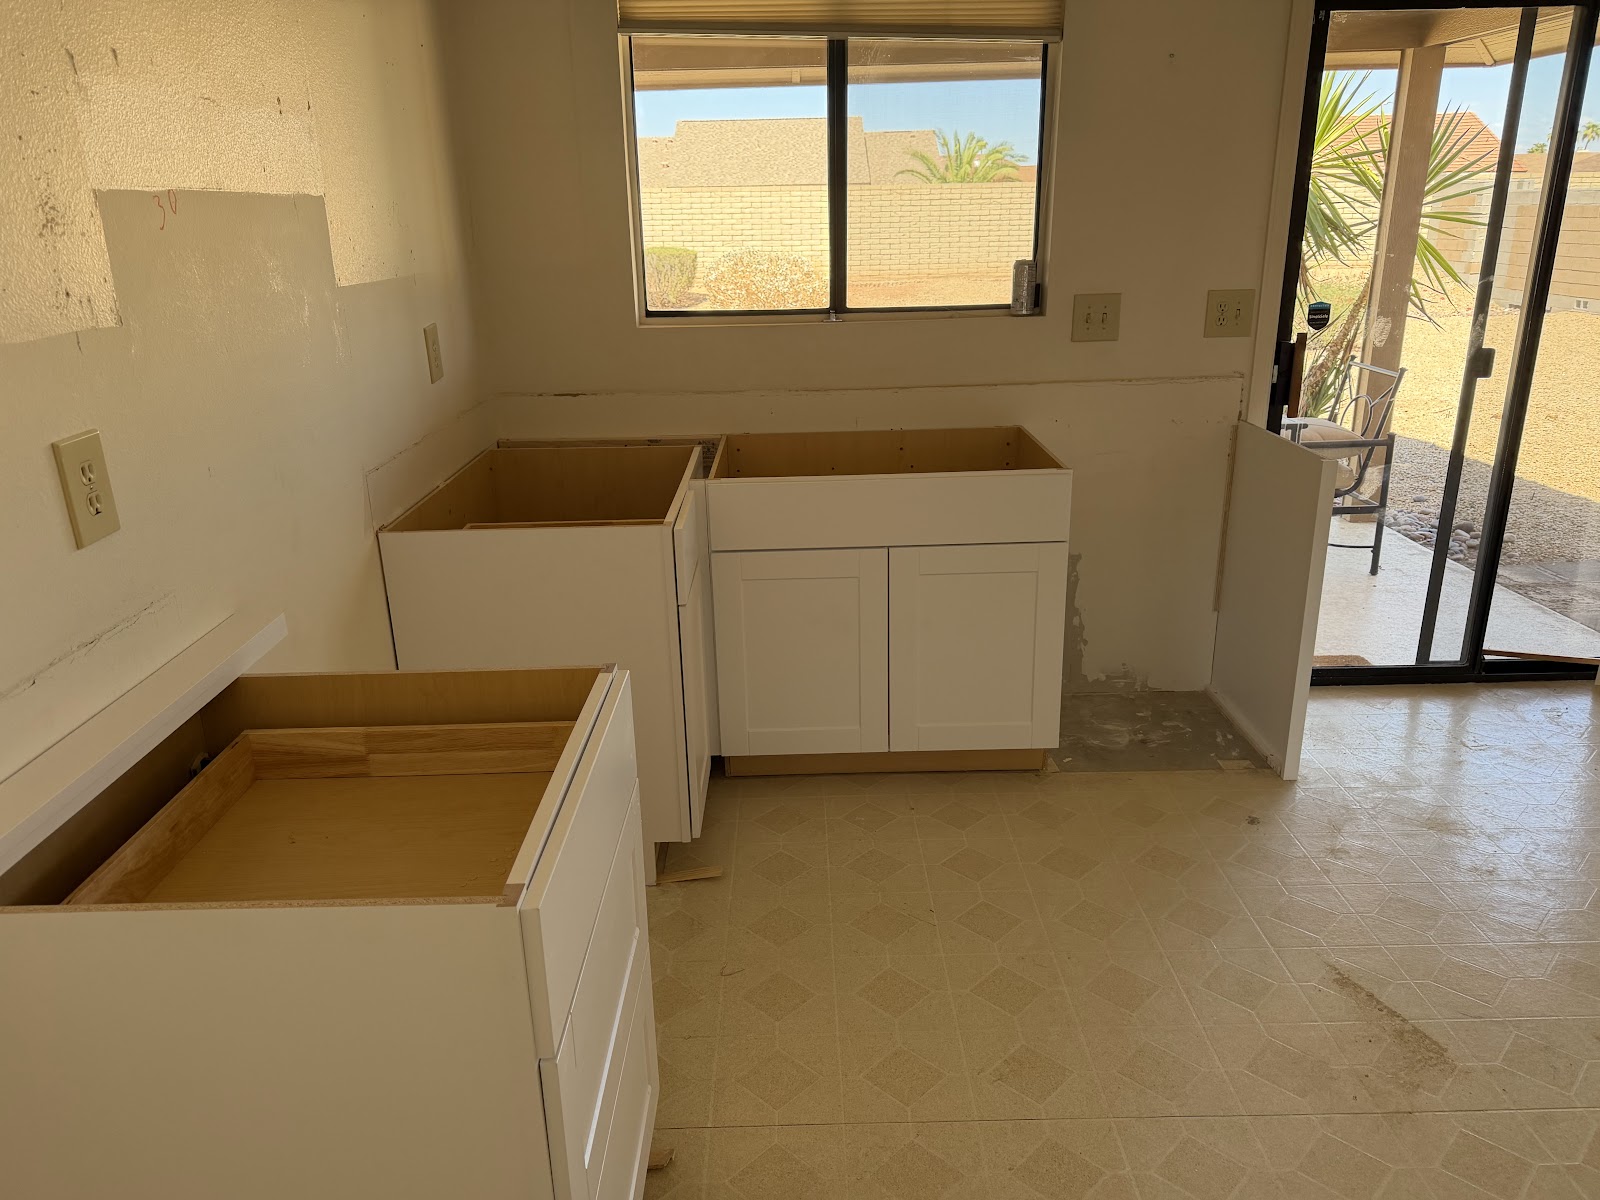
- The scope: Remove the old cabinets, keep the counter and sink working through demo, lay out and hang a new run of assembled stock cabinets, scribe fillers and an end panel, set doors and hardware
- The cabinets: Hampton Bay Shaker in satin white, assembled boxes supplied by the client: 24 by 30 inch wall cabinets, 36 and 42 inch uppers, a drawer base, a sink base, and a corner base
- What stayed: The laminate counter and sink, the sheet vinyl, the dishwasher, the range location, and the ceiling soffit above the uppers
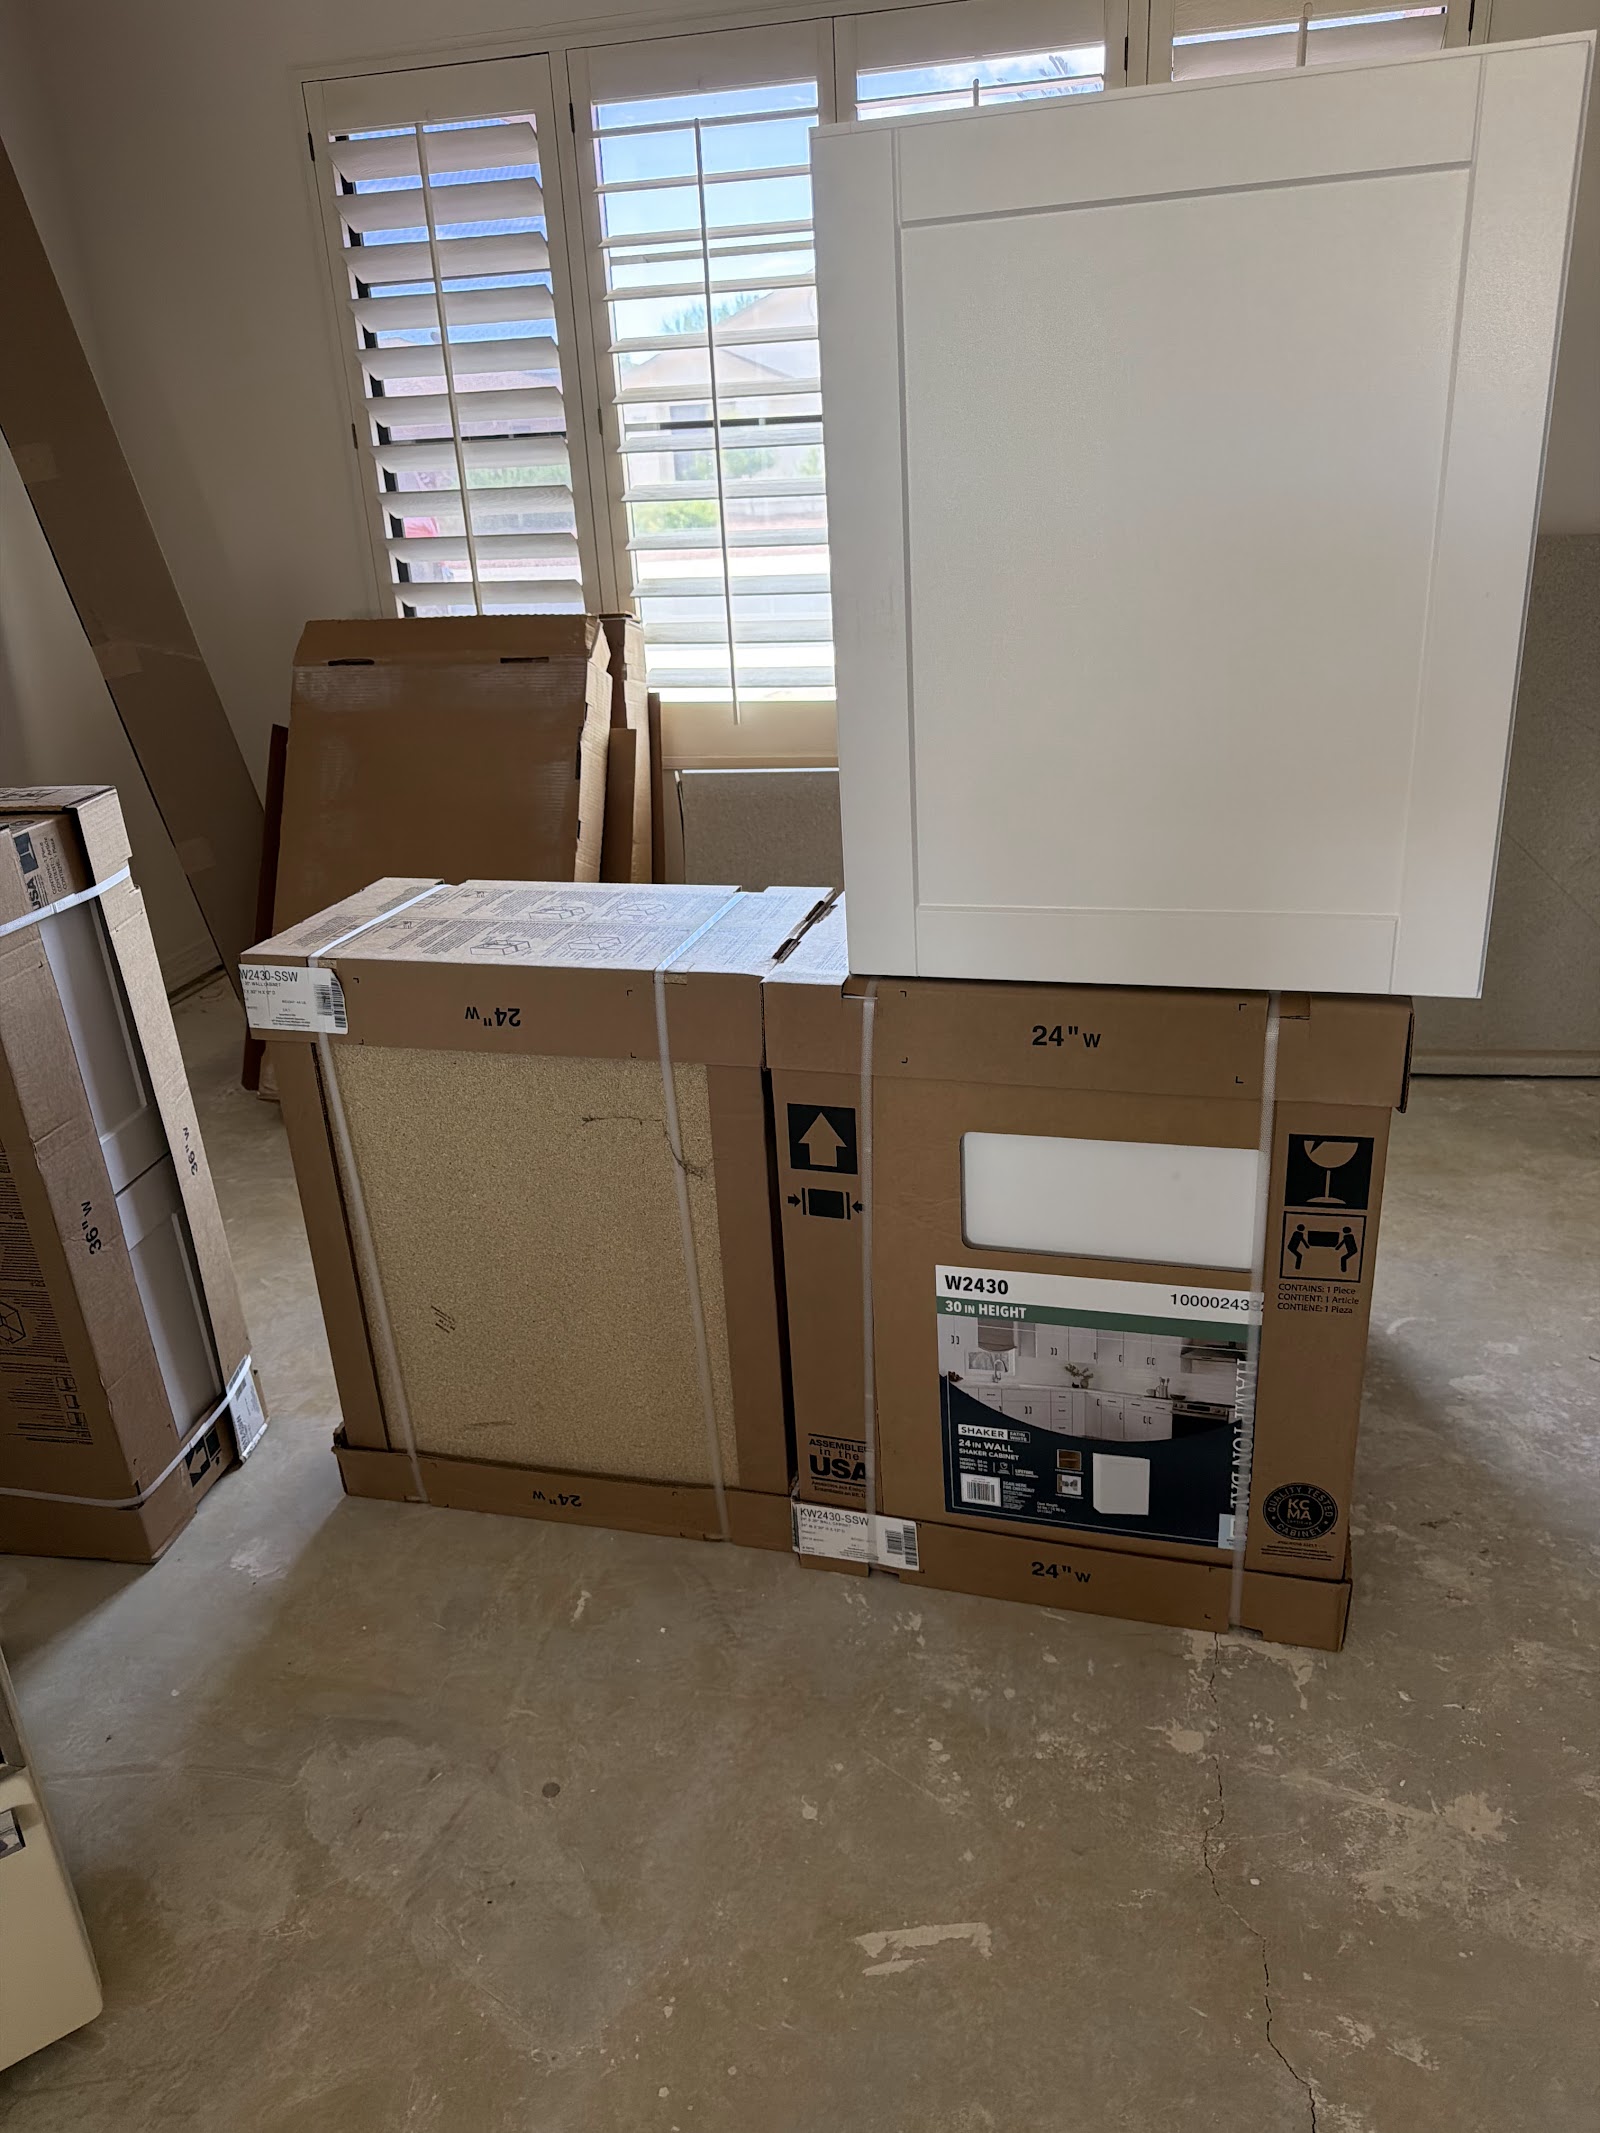
- Timeline: Two site days inside one calendar week, cabinets checked and staged in the house before the first old box came down
- Who did it: Norem Contracting, Arizona ROC #365090, licensed Class B general contractor
Why This Kitchen Only Needed New Cabinets, Not a Full Remodel
The boxes were the only thing wrong with this kitchen. The layout worked, the plumbing was where it needed to be, the counter was serviceable, and the floor was clean. What dated the room was the orange oak and the raised-panel doors, which is the most common complaint we hear about 1980s kitchens across the Valley. A full remodel would have cost this owner ten times what a cabinet swap did and would have kept the unit empty for a month.
There's a version of this job where you reface instead of replace: keep the oak boxes, put new doors and veneer on them. We wrote a separate guide to when that makes sense, refacing the cabinets instead of replacing them, and the short version is that refacing wins when the boxes are plywood and square and the owner likes the layout. Here the client had already priced the numbers and bought assembled stock boxes, which for a landlord turning a rental is often the better math: a white Shaker kitchen photographs well and rents fast, and the cabinets cost less than a reface once you add doors and hardware to both.
What stayed: the laminate counter, the double sink, the sheet vinyl, and the dishwasher
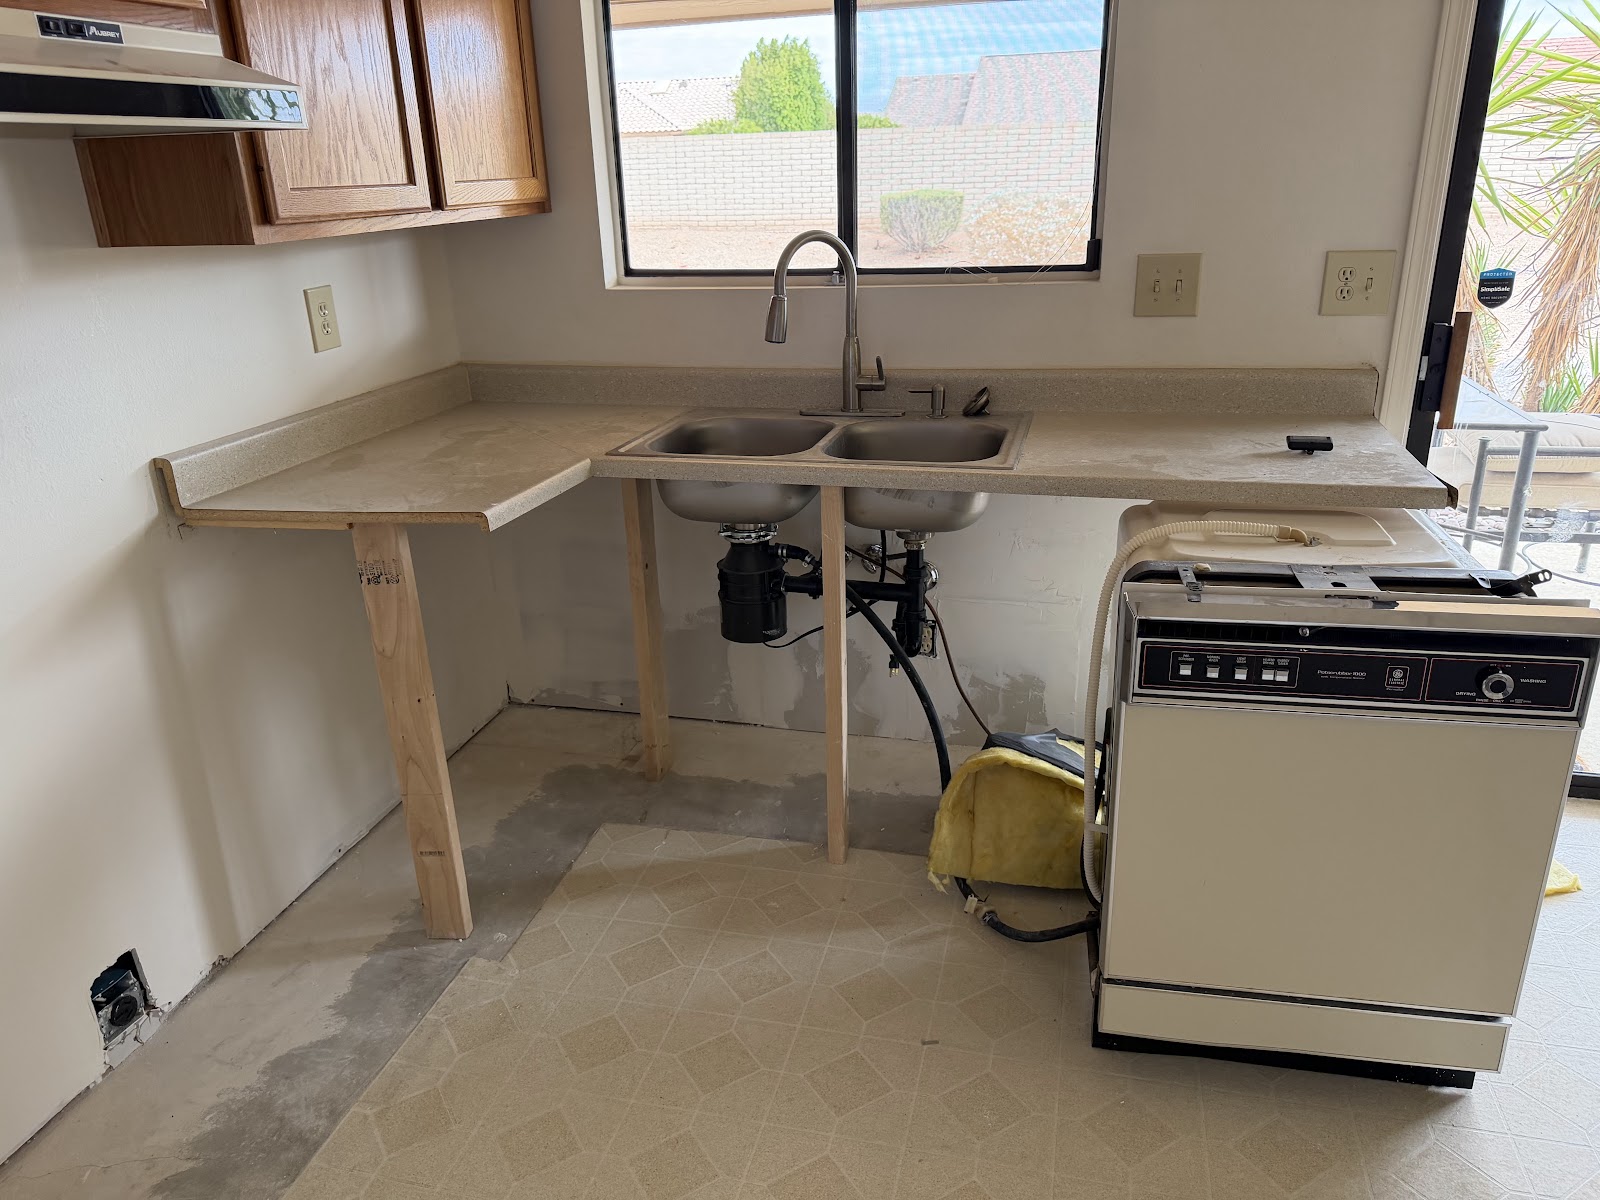
Keeping the counter was the owner's call and it's the decision that made the job interesting. A post-form laminate top from the 80s is particleboard with a laminate skin. It has almost no strength on its own. It was held up by the cabinets underneath, and the moment those cabinets come out, it sags and the corner miter cracks. So the question before demo wasn't whether we could save it. It was how to hold it up with nothing underneath.
How Do You Replace Kitchen Cabinets Without Replacing the Countertop?
You support the countertop before you touch the cabinets under it. We built temporary legs out of 2x4 stock, cut to the height of the underside of the counter, and set them on flat plates every two to three feet along the front and back edges, with one within a few inches of each side of the sink cutout, which is the weakest point in the whole top. Then we cut the old caulk line at the backsplash, backed out the screws holding the old boxes to the counter and the wall, and slid the base cabinets out from under a countertop that never moved.
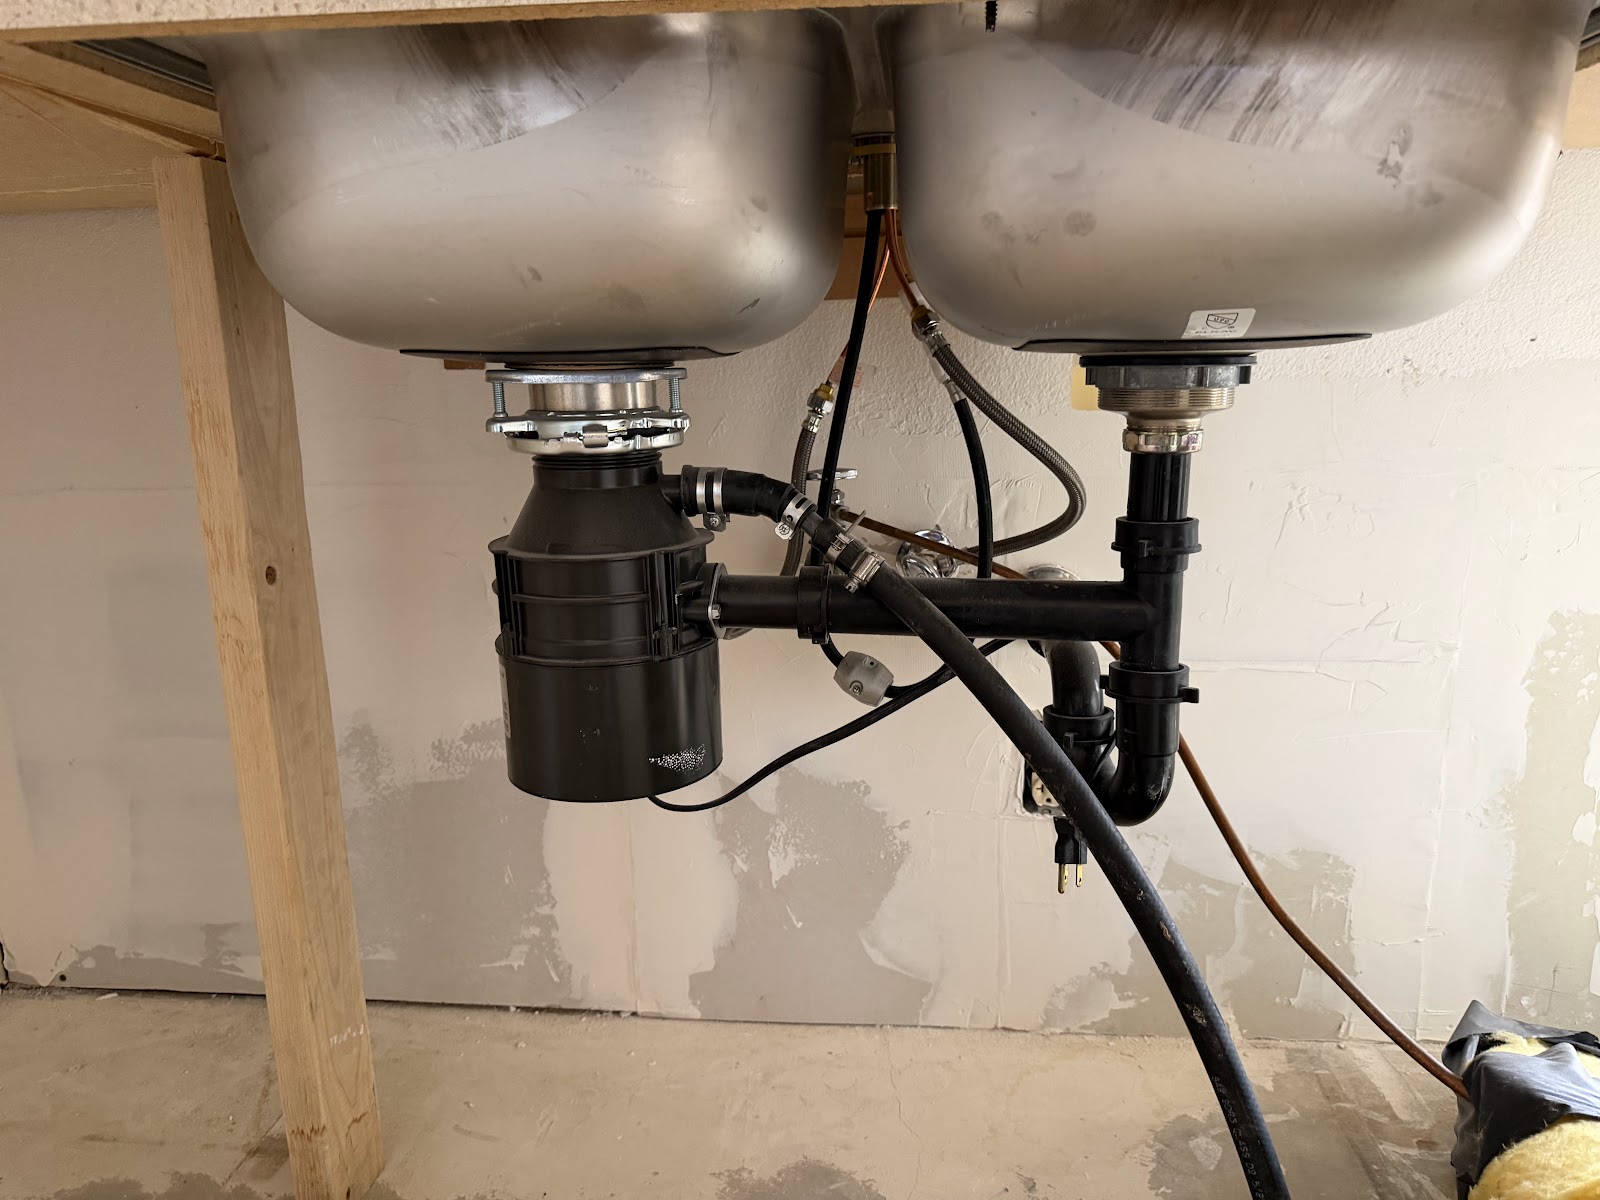
The sink, the faucet, the supply lines, and the disposal stayed connected the whole time. The tenant turnover crew could wash out a bucket at noon on demo day. It costs a couple of hours of carpentry up front and saves a plumber's disconnect and reconnect, plus the days the kitchen would otherwise sit dry.
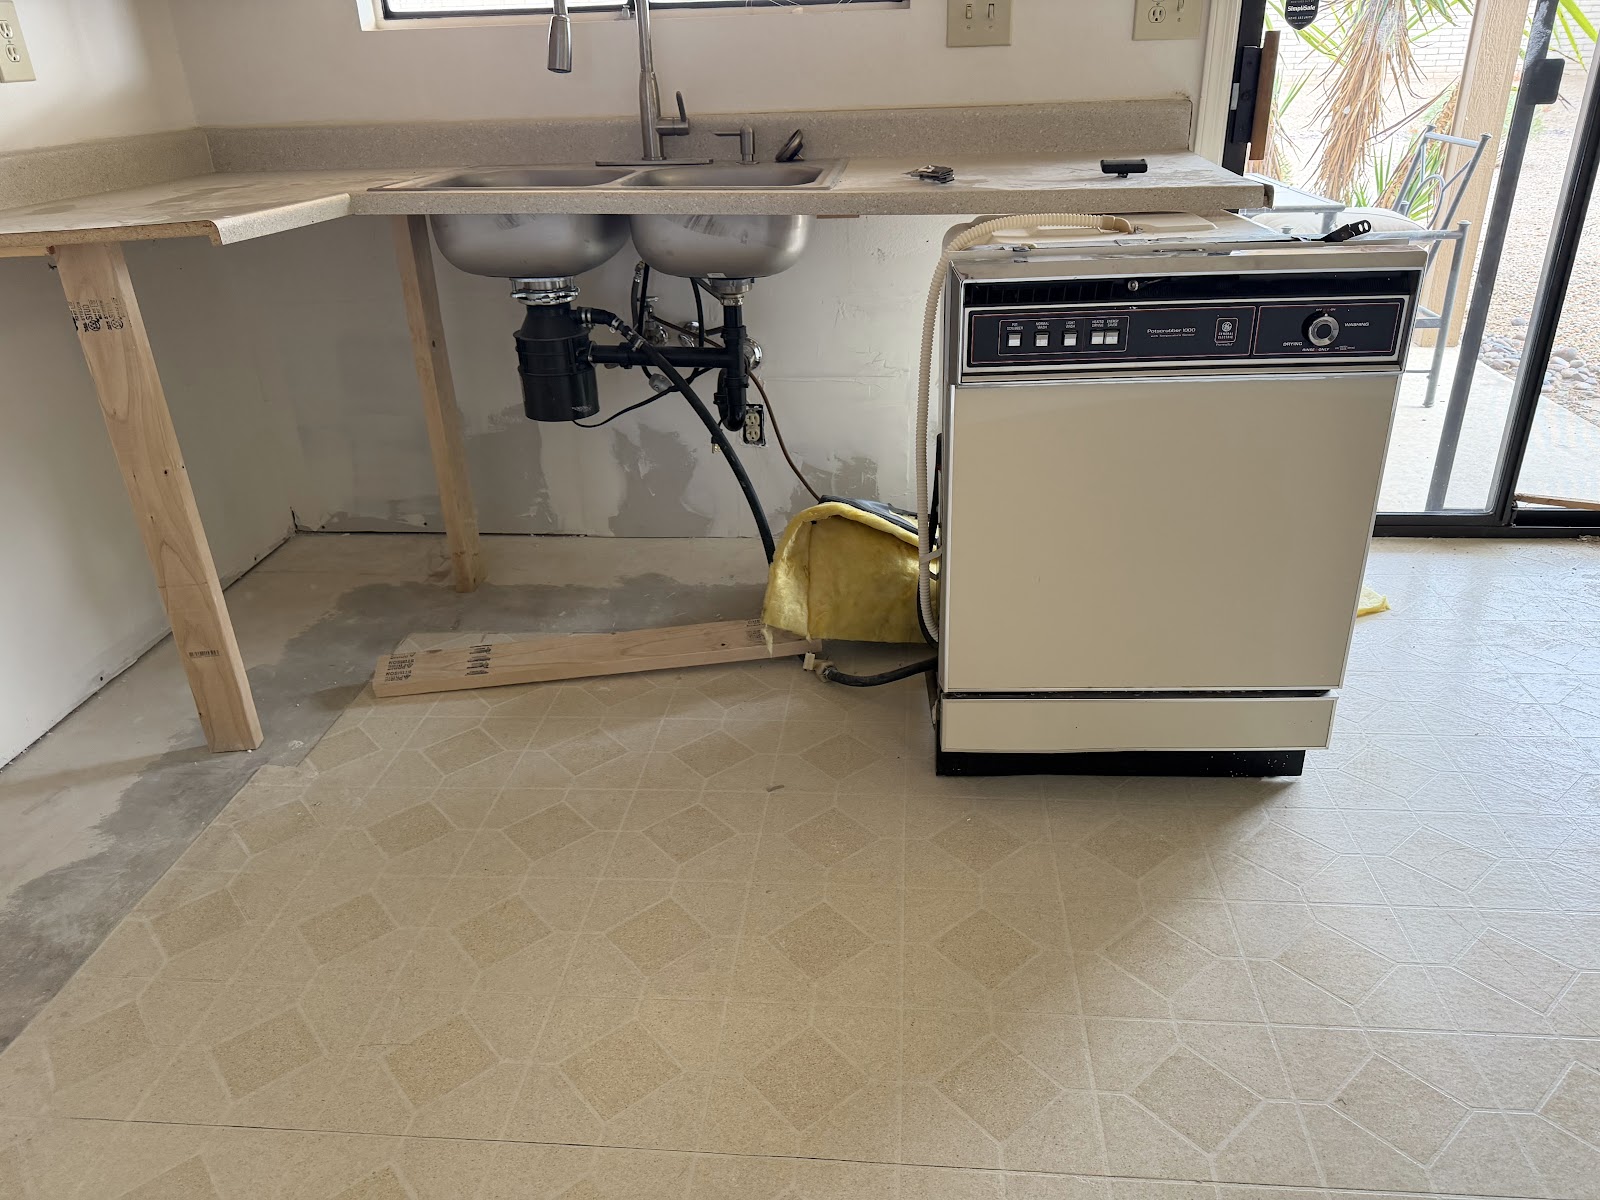
The honest limit on this trick: it only works when the new cabinets land in the old footprint. The new sink base has to sit under the old sink cutout, the overhang has to fall in the same place, and the run has to end where the old run ended. Change the layout by six inches and the counter goes in the dumpster with the oak. On this job the client's cabinet order matched the old run almost box for box, so the counter went back down on the new bases like it had been waiting for them.
Taking Out the Original Golden-Oak Cabinets
Uppers come down first so you're not reaching over base cabinets to get at them. We pulled the doors, then found the screws through the hanging rails inside the boxes and backed them out one cabinet at a time, starting from the end of the run and working toward the corner. Each box came off the wall in one piece and went straight out the sliding door to the trailer.
The bases came out the same way, after the counter was on its legs. The sink base was the last one, because it had the plumbing running through the back of it. We cut the back panel around the supply and drain stub-outs and slid the box forward off the pipes, which is faster and cleaner than disconnecting anything.
Behind the old uppers we found what you always find behind 1980s cabinets: unpainted, untextured drywall with a few torn spots where the old screws pulled. That's normal. The new uppers cover the same band, so a full texture match wasn't needed here, but we patched and primed the strip that would show above the counter before a single new box went up. Once the uppers are hung you can't reach that wall again.
Laying Out the New Run Before a Single Box Goes Up
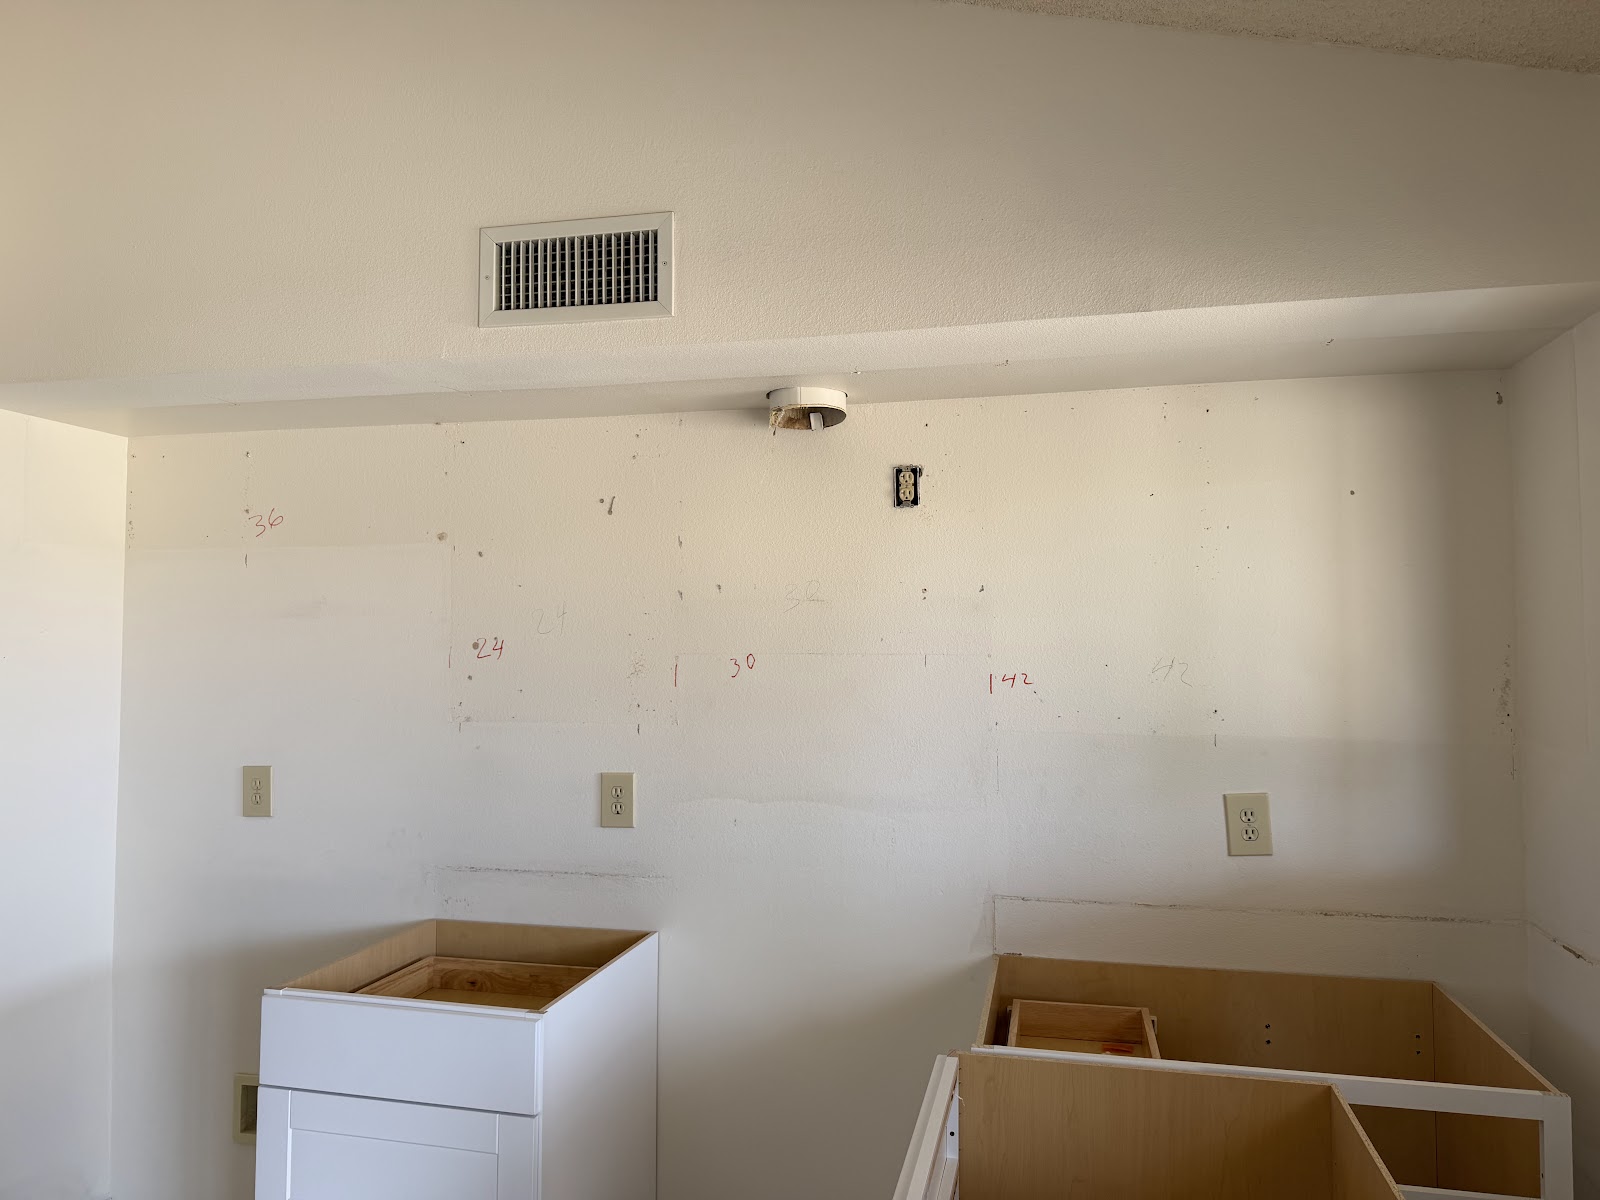
Layout takes an hour that most people skip, and it decides whether the rest of the job goes well. The floor in a forty-year-old house is not flat. If you measure 34-1/2 inches up from the floor at one end and again at the other end, the two marks will not line up, and the countertop will rock. So we find the highest point of the floor along the whole run with a laser, and every vertical line comes off that one spot. A base cabinet can be shimmed up off a low spot. It cannot be sunk into a high one.
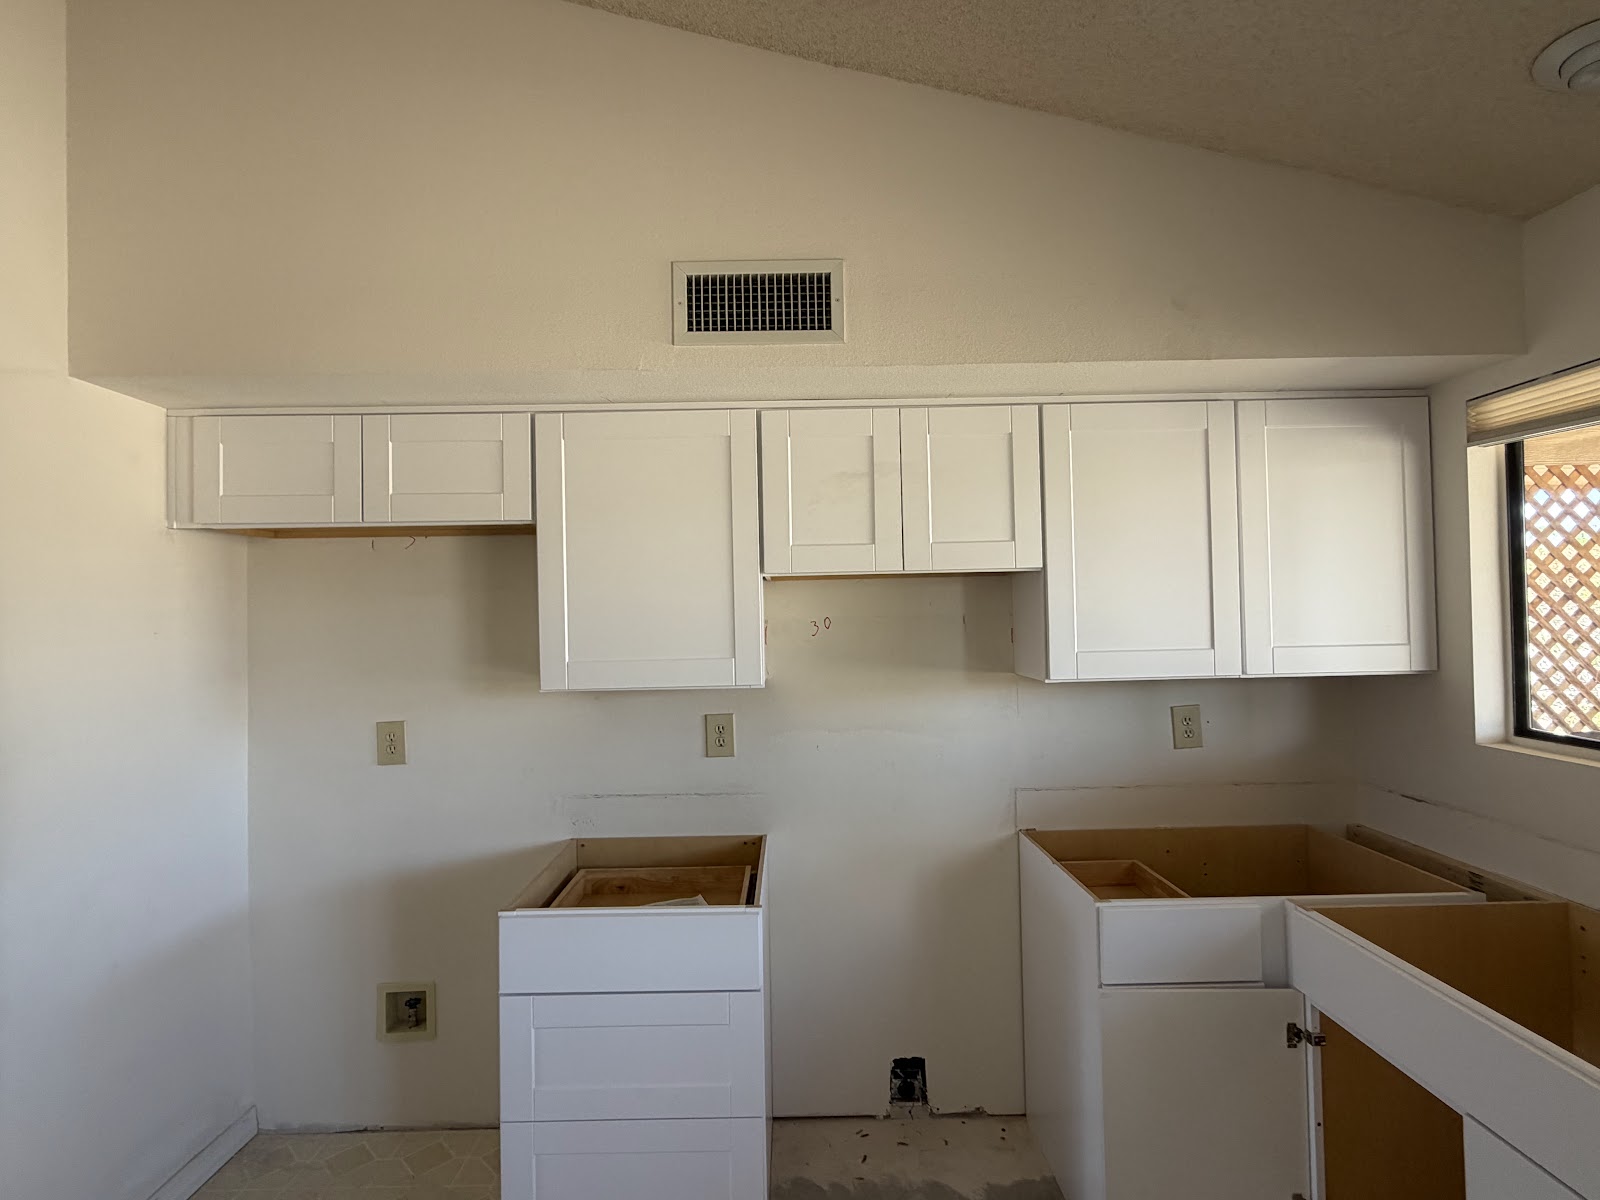
The red layout lines: 36, 24, 30, 42, and the 39-inch mark
We drew the run on the wall in red before anything was hung: the width of each box, the position of each stile, and the level lines. Two lines matter most. The top of the base boxes sits at 34-1/2 inches from the high point of the floor, and the counter on top of that lands at the standard 36-inch height. A post-form laminate top is 3/4-inch substrate with a built-up front edge, so we measure the actual top going back on rather than assuming. The bottom of the uppers sits at 54 inches, which leaves 18 inches of open backsplash between the counter and the wall cabinets. Eighteen is the usual number, not a required one; anywhere from about 15 to 20 works, and the appliances and the soffit often decide it. On this kitchen the soffit above the uppers set the top of the wall cabinets, so we checked that a 30-inch upper hung at 54 would tuck under the soffit with no gap and no cut. It did, by a hair.
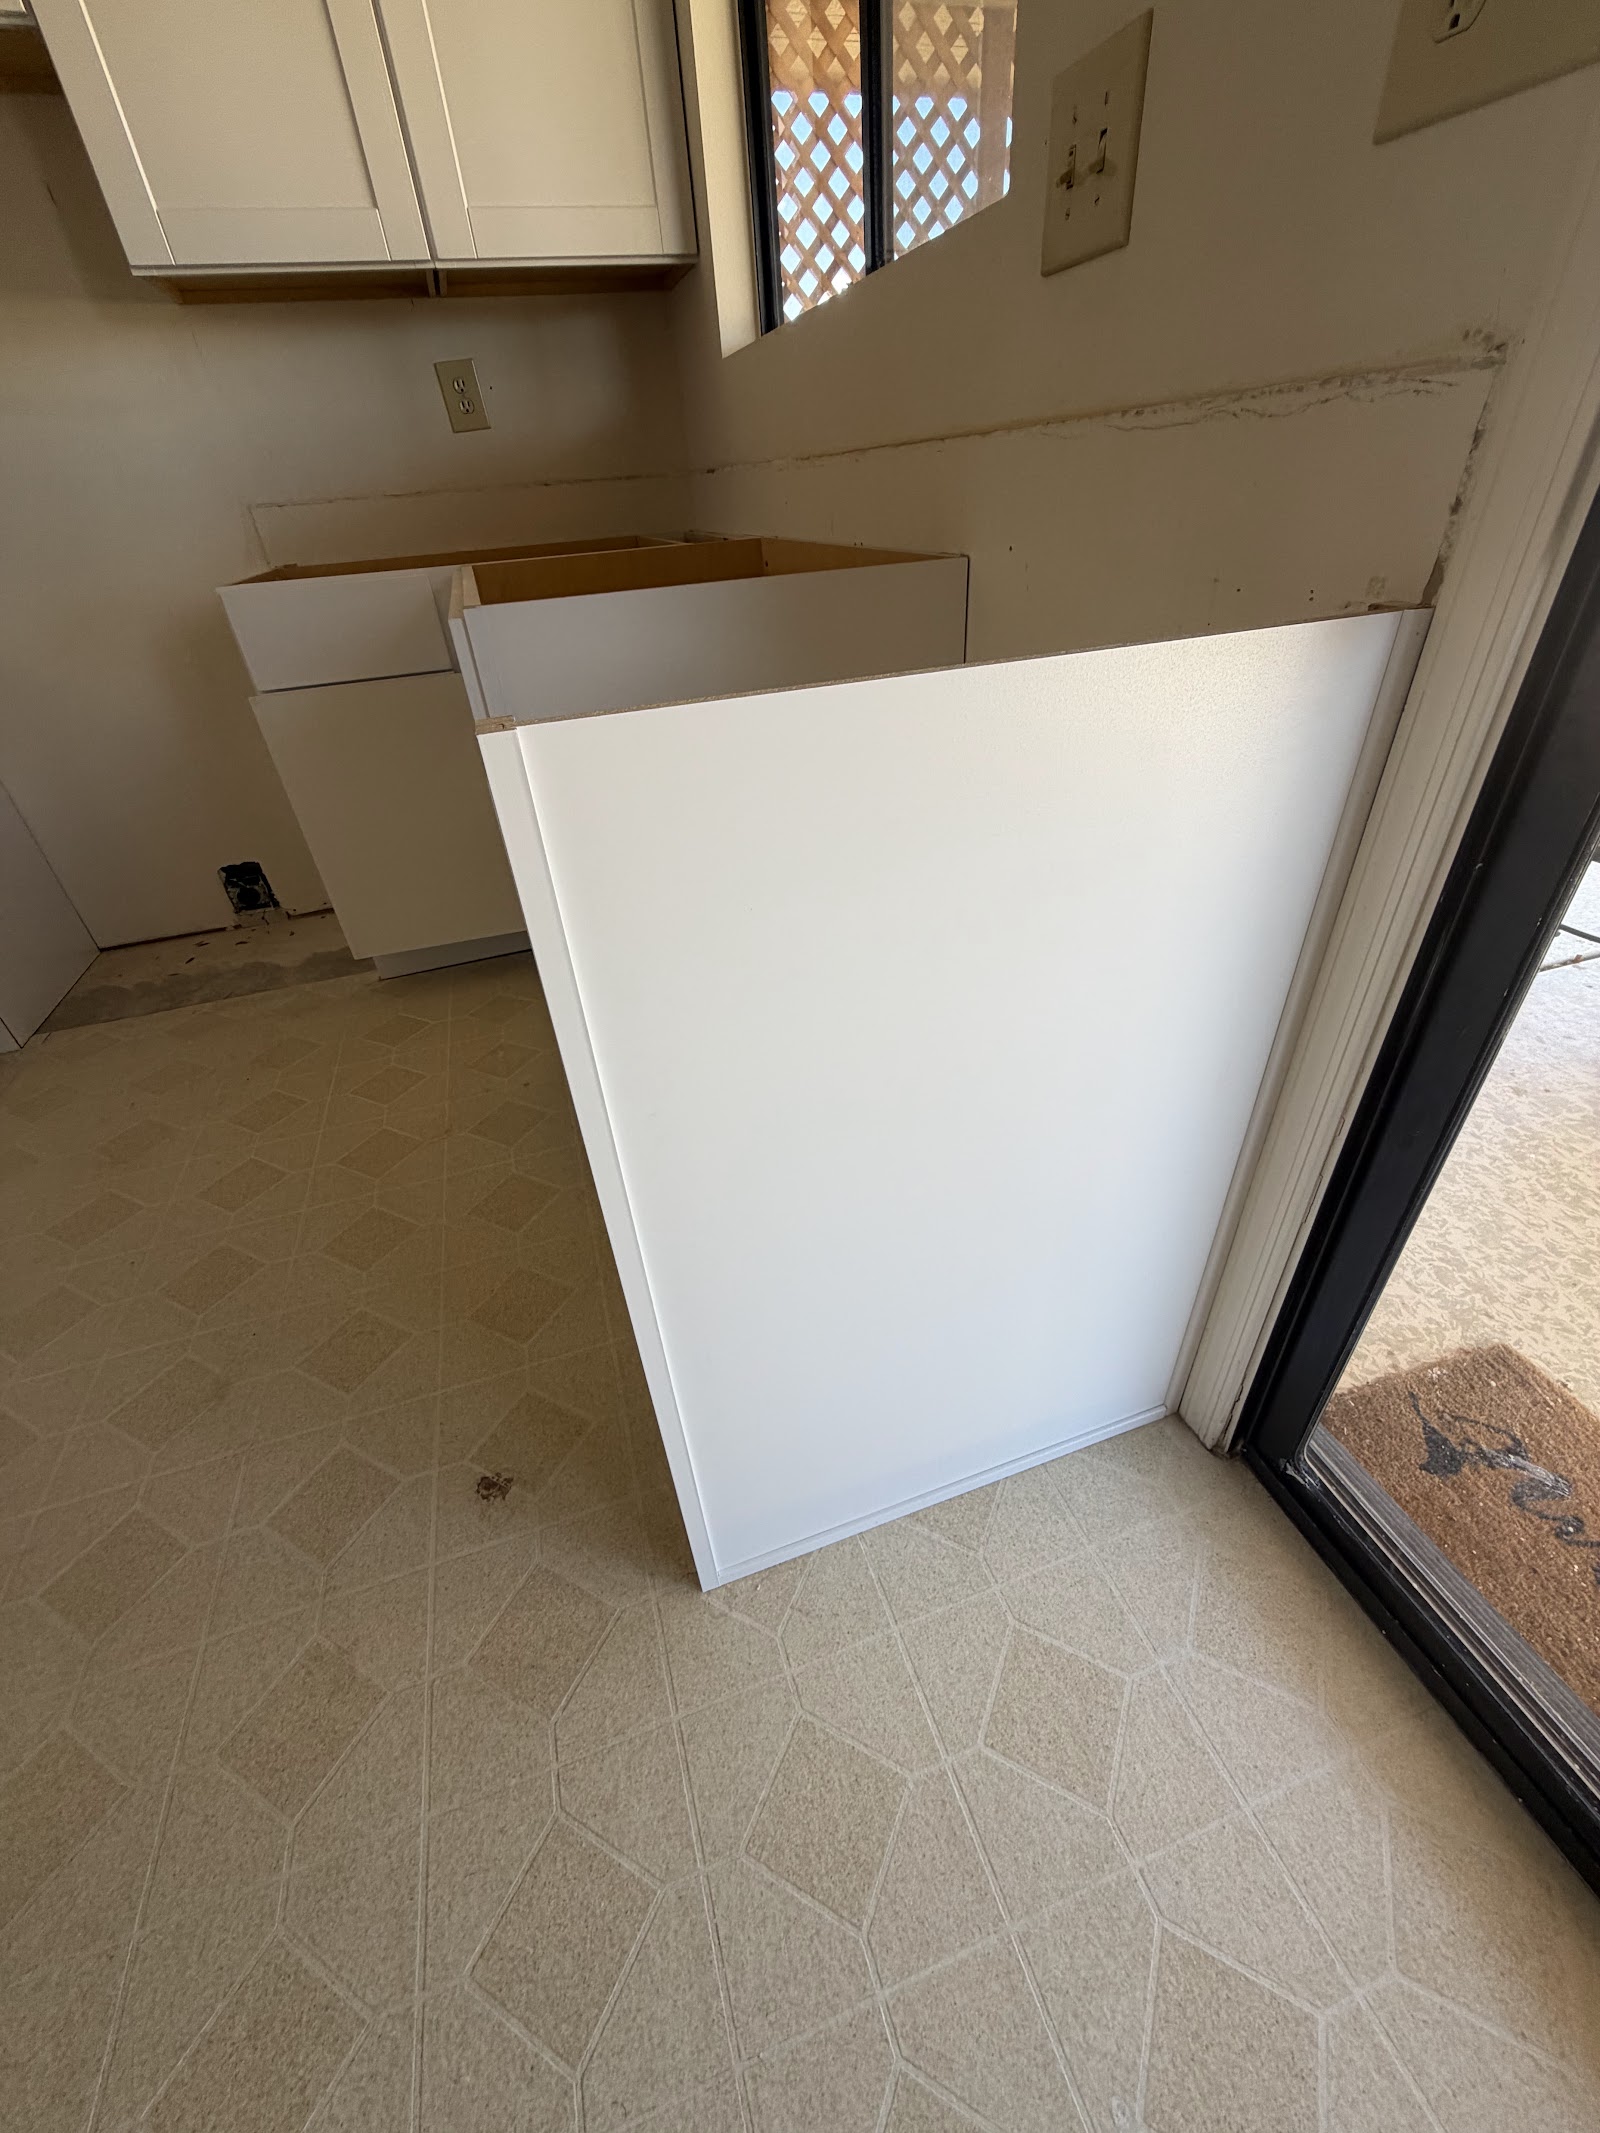
The 39-inch line on the wall is the height of the top of a filler and end panel at the slider, where the run dies into an out-of-square wall. That mark told us how much material we had to scribe against before we cut anything.
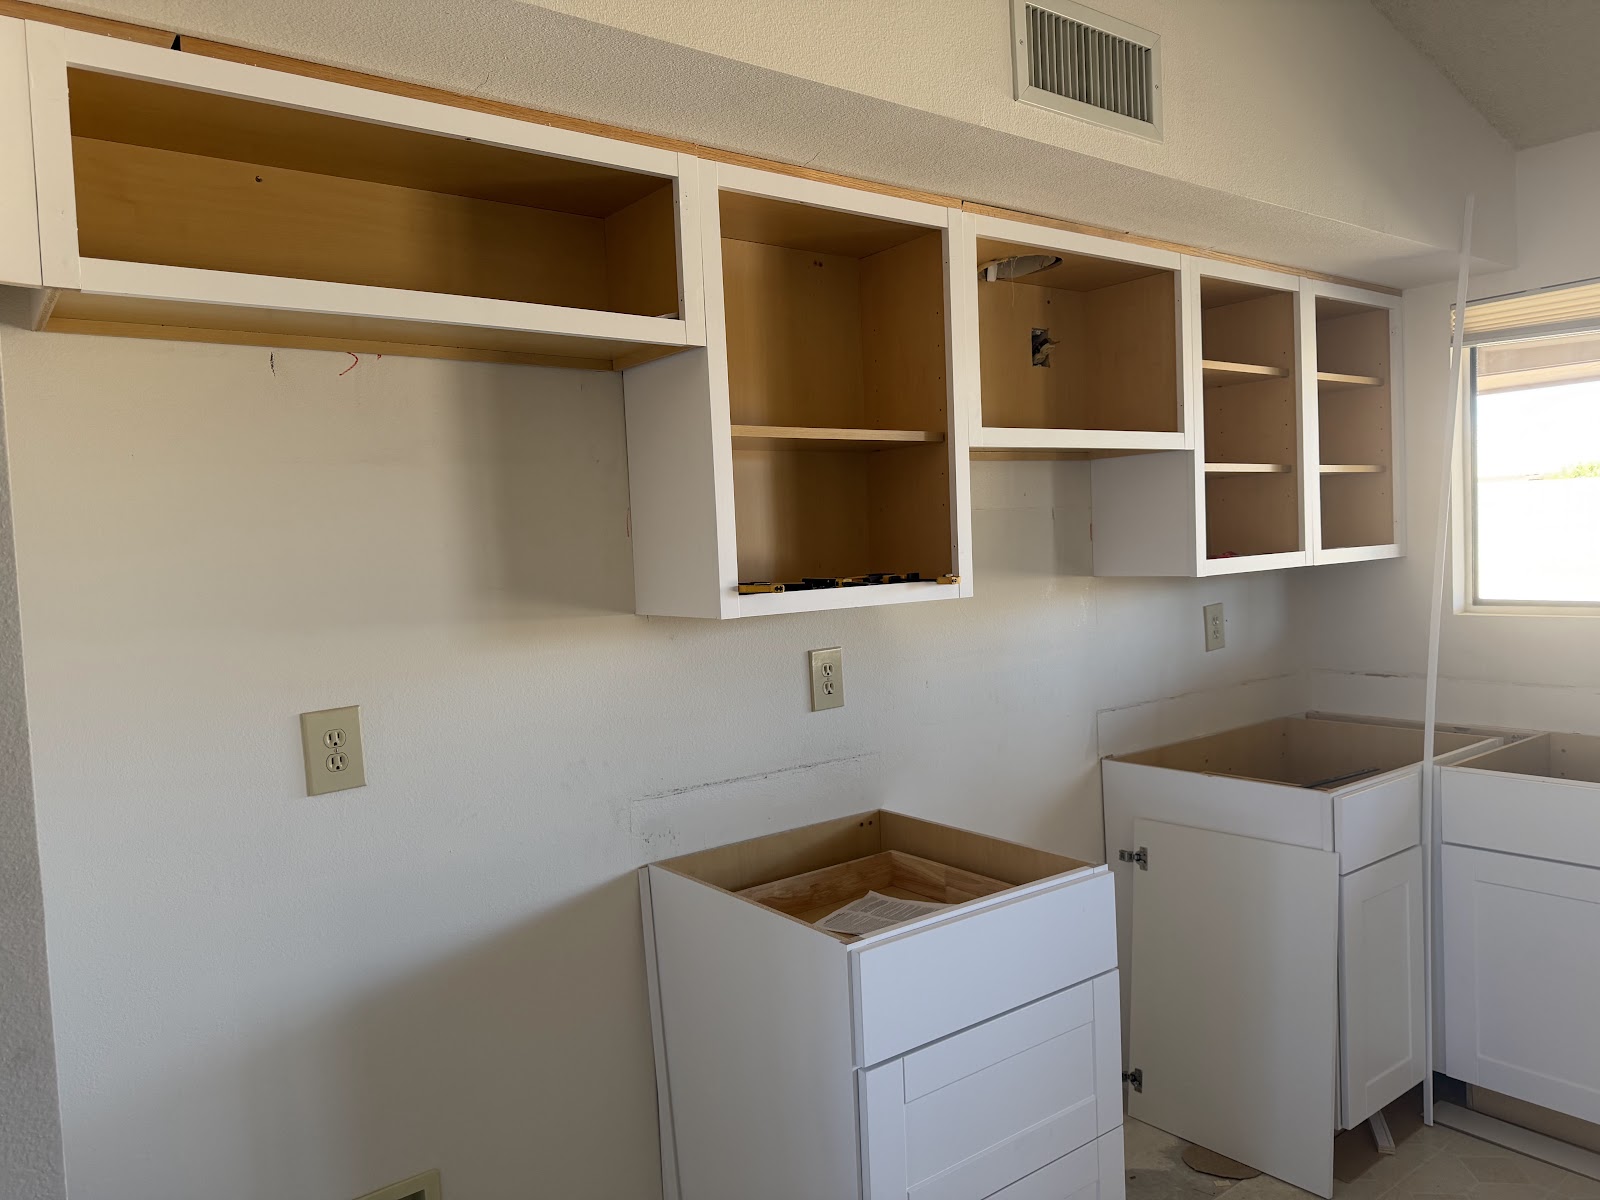
Leaving the 30-inch range hood opening between two uppers
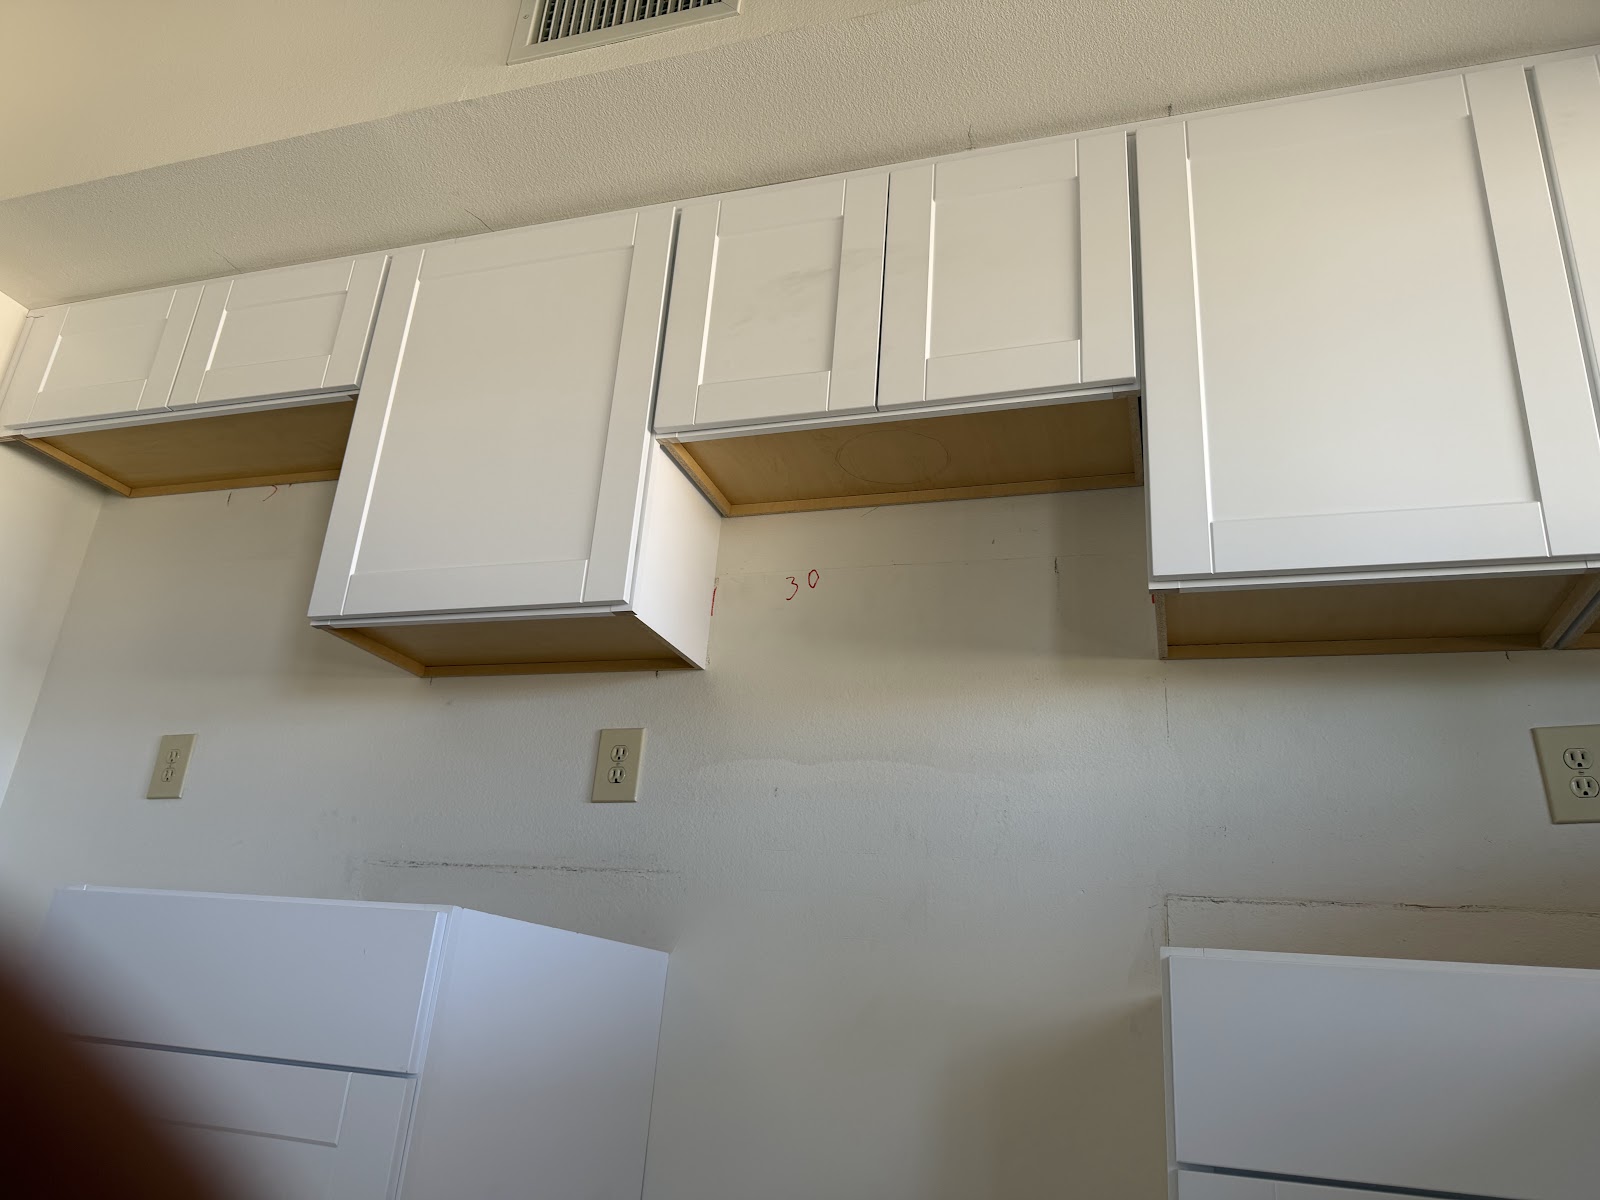
A 30-inch range needs a 30-inch-wide opening between the uppers, and that is a different number from the vertical clearance above the cooktop. Code and the hood's own manual set that one: typically 30 inches from the cooking surface to an unprotected cabinet above, and less only where the manufacturer's instructions and the required protection allow it. On this kitchen the hood cabinet is a shorter box hung so its top lines up with the neighbors and its bottom lands where the hood's own instructions put it. We framed the opening a hair over 30 inches so the range would slide straight in against walls that were not plumb.
How Do You Hang Upper Cabinets Under a Soffit on a Vaulted Ceiling?
You screw a ledger board to the wall with its top edge on the 54-inch line, rest each upper on it, and the board holds the cabinet while you shim and drive the screws. That's the biggest difference between a professional install and a weekend one. Without a ledger, one person holds a 60-pound box over their head while another tries to level it and find a stud. With a ledger, one person can hang the whole run.
The ledger goes into stud centers with screws long enough to carry the weight, and it comes off when the last upper is fastened. On this job the ledger had to be set below the backsplash line so it wouldn't interfere with the counter we'd kept, and the counter got a sheet of luan over a moving blanket before we set a single tool on it.
The soffit changed one thing. On a kitchen with no soffit you can leave the uppers slightly low and fill the gap at the ceiling with crown. Here the uppers had to tuck tight under the soffit, so the 54-inch line was not negotiable and the shims did the rest.
Finding studs through forty-year-old drywall
The wall behind these cabinets was wood frame on 16-inch centers with half-inch drywall. That is never a safe assumption in Sun City West: Del Webb built it out from 1978 on, and plenty of West Valley houses from that era are block exterior with wood-framed interior partitions. We confirm which wall we have on every job before the first screw, because a furring strip will not hold a loaded upper cabinet. On block, the fasteners go through the furring and into the block with masonry anchors, which is a different day's work.
On textured older drywall an electronic stud finder lies. We use a magnetic finder that picks up the drywall screws, mark the stud centers, and confirm each one with a finish nail in a spot the cabinet will cover. Then the boxes get cabinet screws through the hanging rails, top and bottom, into every stud the box crosses, with washers where the rail is thin. Two and a half inches is the common length, and it depends on what the screw has to pass through. Never drywall screws. They're brittle, and a cabinet full of dishes hanging on drywall screws is how uppers end up on the floor.
Bases First Here, Then Doors, Fillers, and Hardware
Most kitchens get uppers first, for the reason above. This one got the bases set first on the sink wall, because the counter was already up on legs and the base run had to go back under it before the props could come out. Order matters less than doing each step right, and the steps were the same either way.
- Check every box against the plan before demo. Doors, drawers, shelves, hardware bags, hinge sides, shipping damage. A missing part on client-supplied stock is a three-day delay, so this happens before the old cabinets come off the wall.
- Find the high point of the floor and strike the level lines. 34-1/2 inches for the top of the bases, 54 inches for the bottom of the uppers, both from the same spot.
- Mark stud centers and the width of every box on the wall. Carry the stud marks above the top of the uppers so they stay visible.
- Set the bases on the sink wall to the line, shim under and behind, and check the run with a straightedge. Level box to box is not enough. A run that wanders will fail a countertop template.
- Drop the counter back onto the new bases and pull the temporary legs. Refasten from underneath.
- Set the ledger and hang the uppers from the corner out. Start at the corner, plumb and level the first box, and work in both directions so error never accumulates at one end.
- Clamp the face frames flush and screw stile to stile, uppers and bases alike. Screws roughly every 8 to 10 inches and at least three per joint on a standard box, hidden behind the door, pre-drilled and countersunk. On a face-frame cabinet the frames are what get joined, not the box sides.
- Scribe the fillers and the end panel. Hold the piece to the wall, scribe the gap, cut to the line, back-bevel the edge, and fasten from behind the stile.
- Doors, drawer fronts, hinges adjusted, pulls drilled with a jig, bumpers on. Sight down the run and set every reveal to match.
Scribing the filler and end panel to an out-of-square wall by the slider
The run ended at the wall next to the sliding glass door, and that wall was neither plumb nor straight. Nobody's is after forty years. Stock cabinets come in three-inch increments, so the gap between the last box and the wall is what fillers are for, and we plan at least three inches of filler at any wall so there's material to scribe. We ripped the filler to width, held it to the wall, ran a scribe down the profile, cut it with a jigsaw, dressed the edge with a belt sander, and back-beveled it so only the front edge touches. Then it got screwed to the cabinet stile from behind. The finished end panel got the same treatment, glued and pinned with 18-gauge brads, holes filled with a color-matched putty.
How Much Does Kitchen Cabinet Installation Cost in Phoenix?
Labor to hang stock cabinets in the Phoenix metro runs about $100 to $300 per box, or $40 to $100 per linear foot, before demo, wall repair, and the fussy pieces. That puts an eight-box run at roughly $800 to $2,400 and a fourteen-box run at $1,400 to $4,200 in labor alone. The cabinets themselves are on top of that, and a Hampton Bay-class assembled kitchen of ten to twelve boxes lands around $2,000 to $3,500 in material. The numbers below are researched Phoenix market ranges for a job shaped like this one.
| Line item | Typical Phoenix range | What moves it |
|---|---|---|
| Cabinet installation labor, per box | $100 to $300 per box | Assembled vs flat-pack, corner boxes, tall pantries, out-of-square walls |
| Installation labor, per linear foot | $40 to $100 per linear foot | Uppers and bases both counted, fillers and end panels included or not |
| Full run, 8 to 14 boxes, labor only | $800 to $4,200 | Box count, whether the counter stays, how much scribing the walls need |
| Demo and haul-off of the old cabinets | $300 to $700 | Dump fees, whether the counter comes out too, access to the truck |
| Wall patch, texture, and paint behind the old uppers | $250 to $800 | How much shows after the new boxes go up, texture match |
| Shoring the existing counter through demo | $150 to $400 | Length of the run, number of seams and cutouts to support |
| Hardware install, 20 or more pulls | $150 to $350 | Knobs vs pulls, jig layout, client-supplied or not |
| Hampton Bay-class assembled boxes, 10 to 12 box kitchen | $2,000 to $3,500 material | Drawer bases and specialty boxes run highest, wall cabinets lowest |
Ranges are Phoenix market rates for 2026, drawn from published cost data and the jobs we handle. The low end of a labor quote usually means demo, wall repair, and fillers are missing from it, not that the installer is cheaper.
Two things push a cabinet-only job toward the top of those ranges. The first is an older house, because every wall needs scribing and every floor needs the high-point exercise. The second is a change to the footprint, because the moment a base moves six inches the counter, the sink, and possibly an outlet move with it, and the job turns into what a full kitchen remodel costs in Phoenix. This job stayed at the low end for one reason: the client's order matched the old run, so nothing else in the room had to change.
Why Assembled Boxes and Client-Supplied Cabinets Change the Job
Assembled stock cabinets like the Hampton Bay Shaker line arrive as finished boxes, doors on, hinges mounted. That saves a day of assembly versus flat-pack, and what you see in the box is what goes on the wall. It also means the boxes are heavy, they need a conditioned place to sit, and any damage in shipping is visible before we start, which is why step one is always opening every carton.
Client-supplied cabinets are common on rental turnovers and on jobs where the owner has found a deal. We're glad to hang them. The trade-off is that the order is the client's responsibility: if a 36-inch upper arrives as a 33, or a corner base is missing, the install stops until the right box shows up. On a contractor-supplied job that's our problem to solve. On a client-supplied job we flag it the moment we see it, before demo, so nobody is living with a half-finished kitchen while a replacement ships.
The face-frame construction of these boxes also decides how they go together. A face-frame cabinet has a solid hardwood frame across the front, and the frames are what get joined, stile to stile, with the faces clamped dead flush. Screwing through the box sides, which is how frameless European cabinets are joined, does nothing on a framed box except leave a screw where it shows. It's a small thing, and it's what makes a run of separate boxes read as one piece of cabinetry.
What This Means for Rental Turnovers in the West Valley
A property manager with a hundred doors in Sun City and Sun City West sees this kitchen over and over: a solid 1980s box with oak cabinets that make a clean unit photograph like a dated one. The cabinet swap is the highest-return fix in that situation, because it changes the photo without changing the plumbing, the counter, or the floor, and it can happen inside a normal vacancy window. We keep the sink live and work early in summer so the house doesn't heat up with the door open. We zip-wall the kitchen entry and cover the returns so drywall dust doesn't ride the AC through the house, and we leave a usable house every evening.
We're a licensed Class B general contractor, Arizona ROC #365090, which matters on rental work for a reason beyond the license itself: the moment a turnover grows past cabinets, into an outlet move, a hood circuit, a sink relocation, or a soffit coming out, we're already licensed and set up to do it. Arizona's handyman exemption only covers casual or minor jobs under $1,000 total, materials included, and it does not apply at all when the work needs a permit. Most cabinet runs pass that number before the truck is unloaded. Read more about our kitchen remodeling in Phoenix, or the licensed handyman and installation work we do for property managers.
Questions Homeowners Ask About Replacing Kitchen Cabinets
Can you replace kitchen cabinets and keep the same countertop?
Sometimes. It works when the new base cabinets match the old footprint, the sink cutout still lands over the new sink base, and the counter is supported while the old boxes come out. A post-form laminate top has almost no strength on its own, so it gets propped on temporary legs every two to three feet. If the layout changes at all, the counter comes out with the cabinets.
How long does it take to replace kitchen cabinets?
A run of 8 to 14 stock boxes in an older kitchen takes two to four working days on site, usually spread over one week. Demo and haul-off take about half a day, the layout and hanging take one to two days, and fillers, end panels, doors, and hardware take the rest. That assumes every box is on site and checked before the first old cabinet comes off the wall.
Do you need a permit to replace kitchen cabinets in Arizona?
A like-for-like cabinet swap with no electrical, plumbing, or structural change does not normally need a building permit in the Phoenix metro. Moving or adding outlets, running under-cabinet lighting, or relocating the sink does. Sun City West is unincorporated Maricopa County, so its permits run through the county rather than a city, and age-restricted communities add their own contractor rules on top. One thing that catches people on an 80s kitchen: once the counter receptacles are opened up, the current GFCI and spacing rules come into play, and that is permit and inspection work.
What order do cabinets go in, bases or uppers first?
Uppers usually go first, because with the bases out you can stand against the wall and work at a comfortable height. The exception is a kitchen where the countertop is staying in place. Then the counter is protected, the uppers still go up on a ledger, and the bases are set to a level line taken from the highest point of the floor, not from the floor itself.
What Else Is Worth Doing While the Kitchen Is Apart?
A cabinet install puts a finish carpenter and a patch-and-paint setup in your kitchen for two days, with the plumbing already opened up, and the room is already emptied and protected. Work that shares that setup costs a lot less now than as its own trip later, often 25 to 50% below standalone pricing when you ask for it before the job starts. On a kitchen like this one, these are the add-ons that earn their place:
- A new countertop and sink. The biggest visual gap left in a cabinet-only kitchen is a 1980s laminate top on new white boxes. The template has to be taken after the bases are set and level anyway, and the plumbing is the same disconnect either way. Part of our kitchen remodeling work.
- The range hood. The 30-inch opening is already framed for it, and the crew that hung the uppers can set the hood in an hour.
- The dishwasher. The adjacent base is open, the supply and drain are exposed, and a new unit gets leveled to the new cabinet run instead of the old one.
- The floor. New flooring changes the 34-1/2 inch line and the toe kick height, so it's a decision to make before the bases are set, not after. If the sheet vinyl is on its way out, the day the room is empty is the day to do it. See vinyl plank flooring in a Chandler kitchen for how that job runs.
- Removing the soffit. This kitchen kept its soffit, which capped the uppers at 30 inches tall. Taking it out lets the cabinets run to the ceiling, and it has to happen before the cabinet order, because it changes every upper. Read about removing a kitchen soffit for full-height uppers.
- Under-cabinet lighting and outlet moves. The wiring goes in the wall before the uppers are hung and before any backsplash closes it. This is the add-on with the shortest window.
Ask about any of these when you get the estimate, not after the first day. The saving comes from sharing the demo and the protection, and it's only there if the work is planned together.
Have Cabinets Waiting in Boxes, or a Kitchen That Needs Them?
We hang client-supplied and contractor-supplied cabinets across the Phoenix metro, including Sun City, Sun City West, Surprise, Peoria, and Glendale. Send us a photo of the kitchen and the cabinet order and we'll tell you what the install involves and what it costs.
Get a Cabinet Estimate
Written by Harrison Norem, owner of Norem Contracting and a licensed Class B general contractor, Arizona ROC #365090. Fifteen years across the trades, from finish carpentry to full remodels, across the Phoenix metro. More about Harrison.