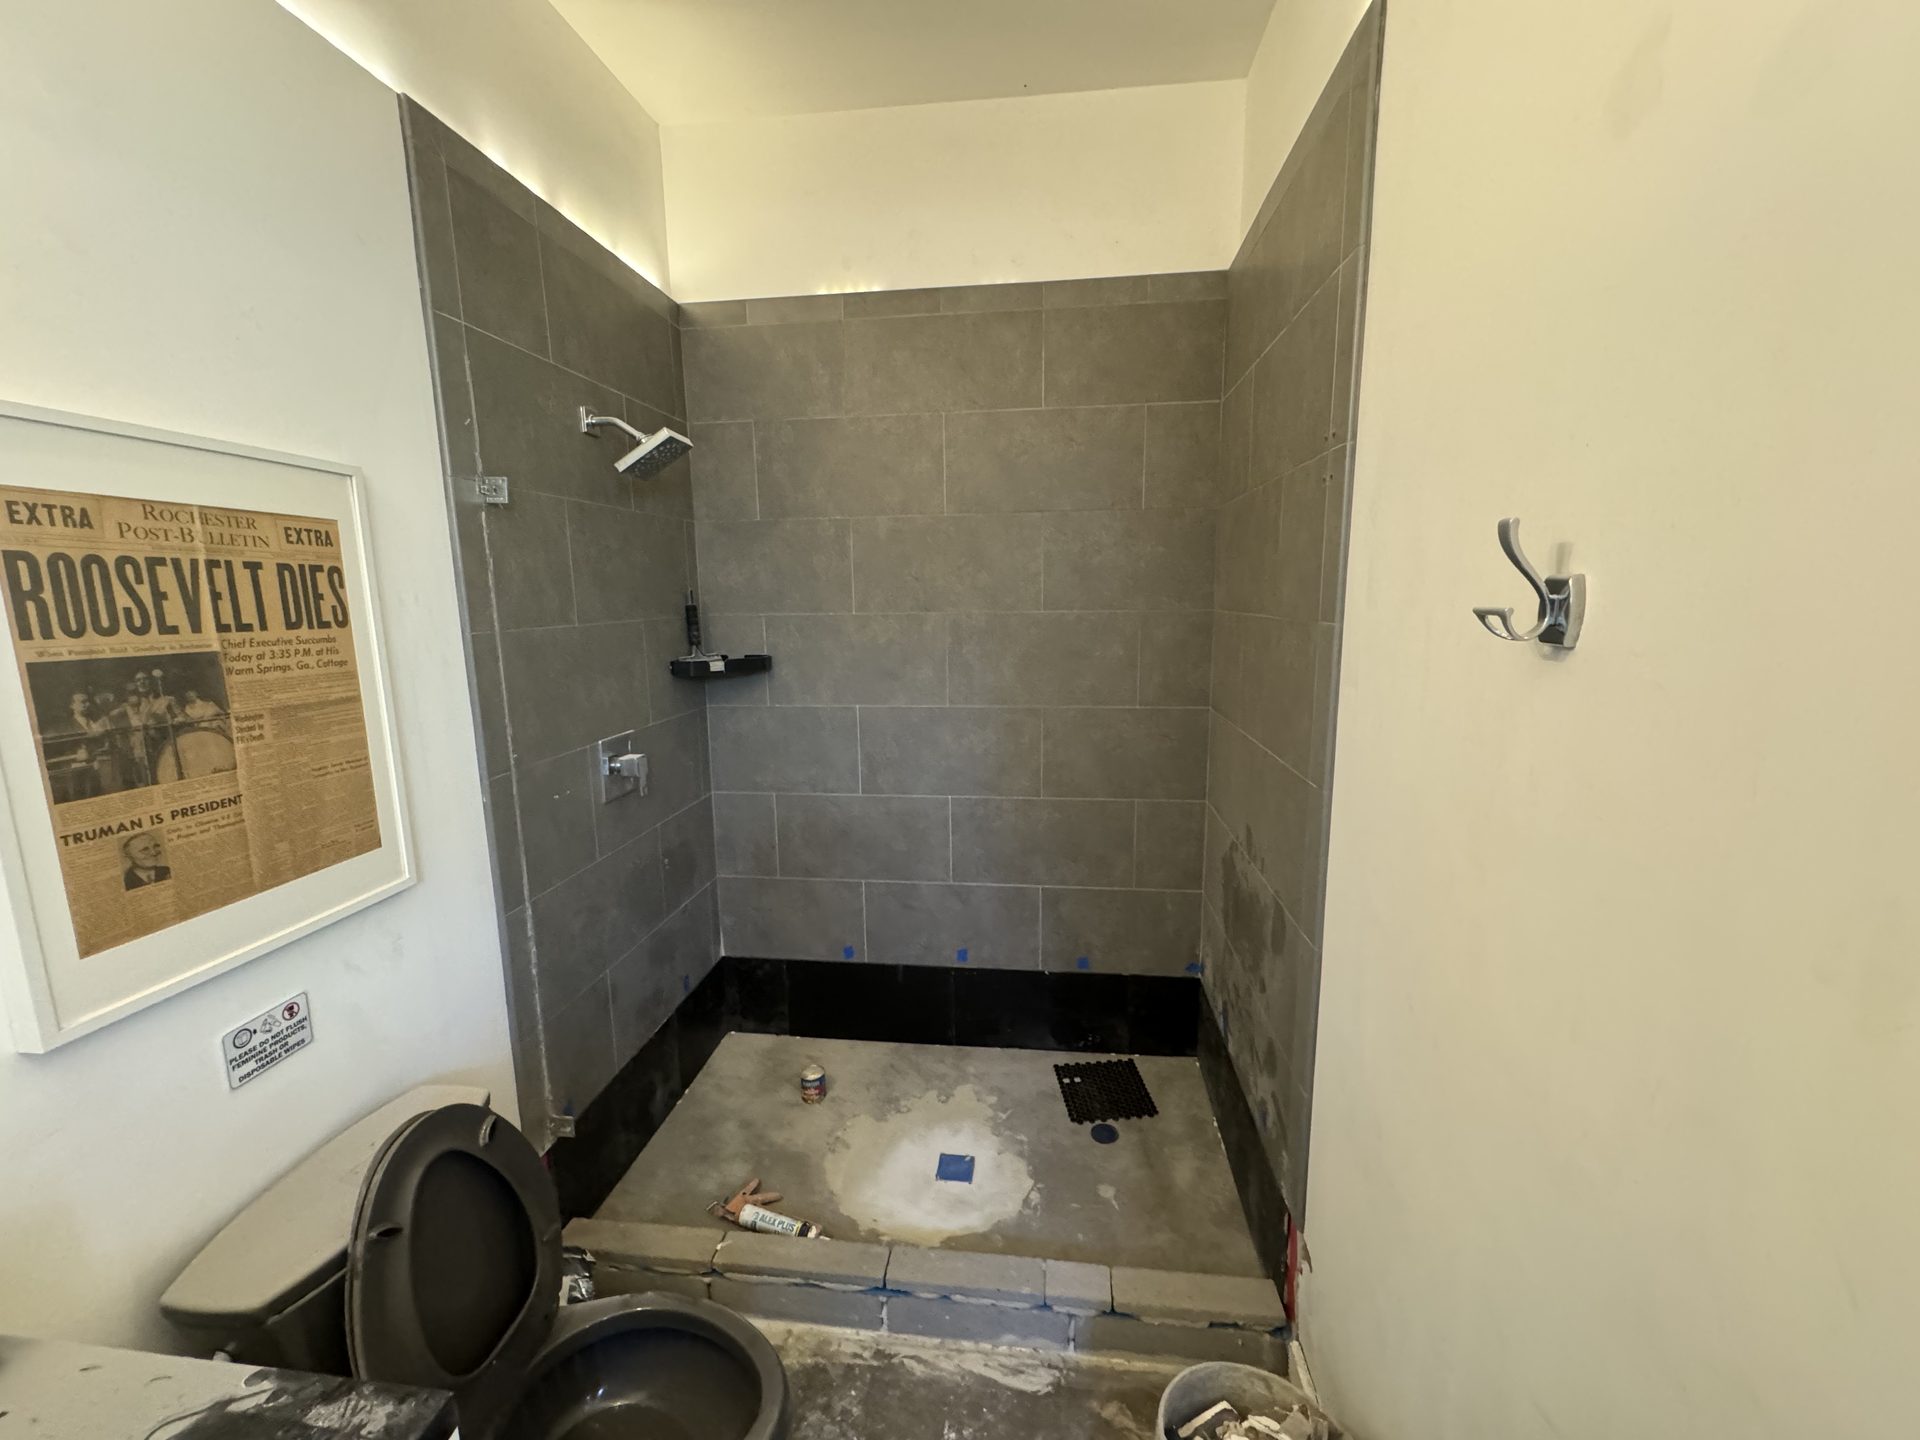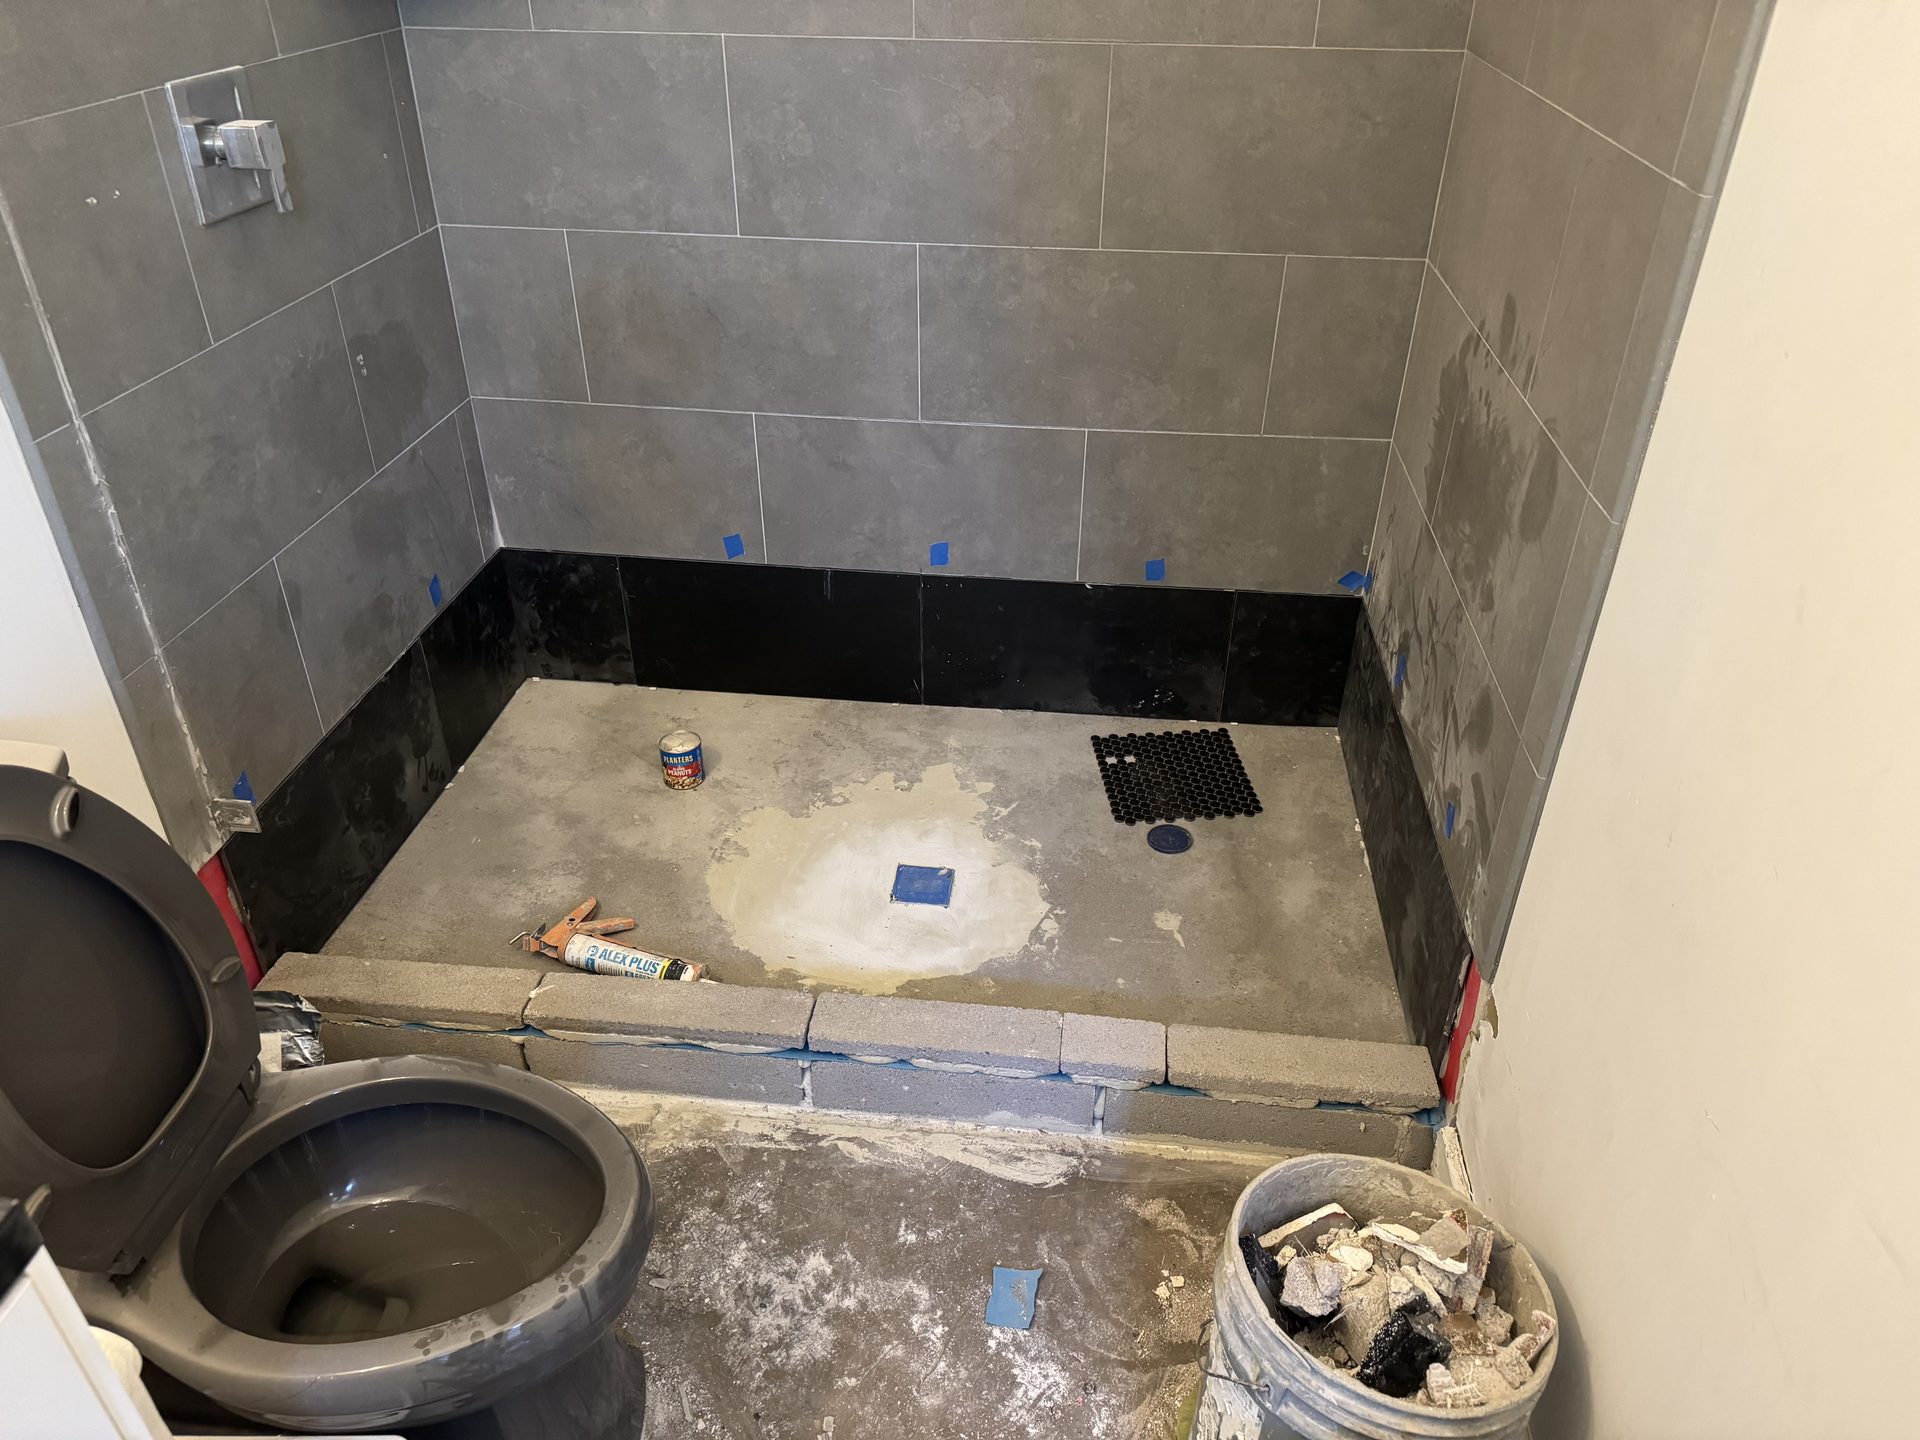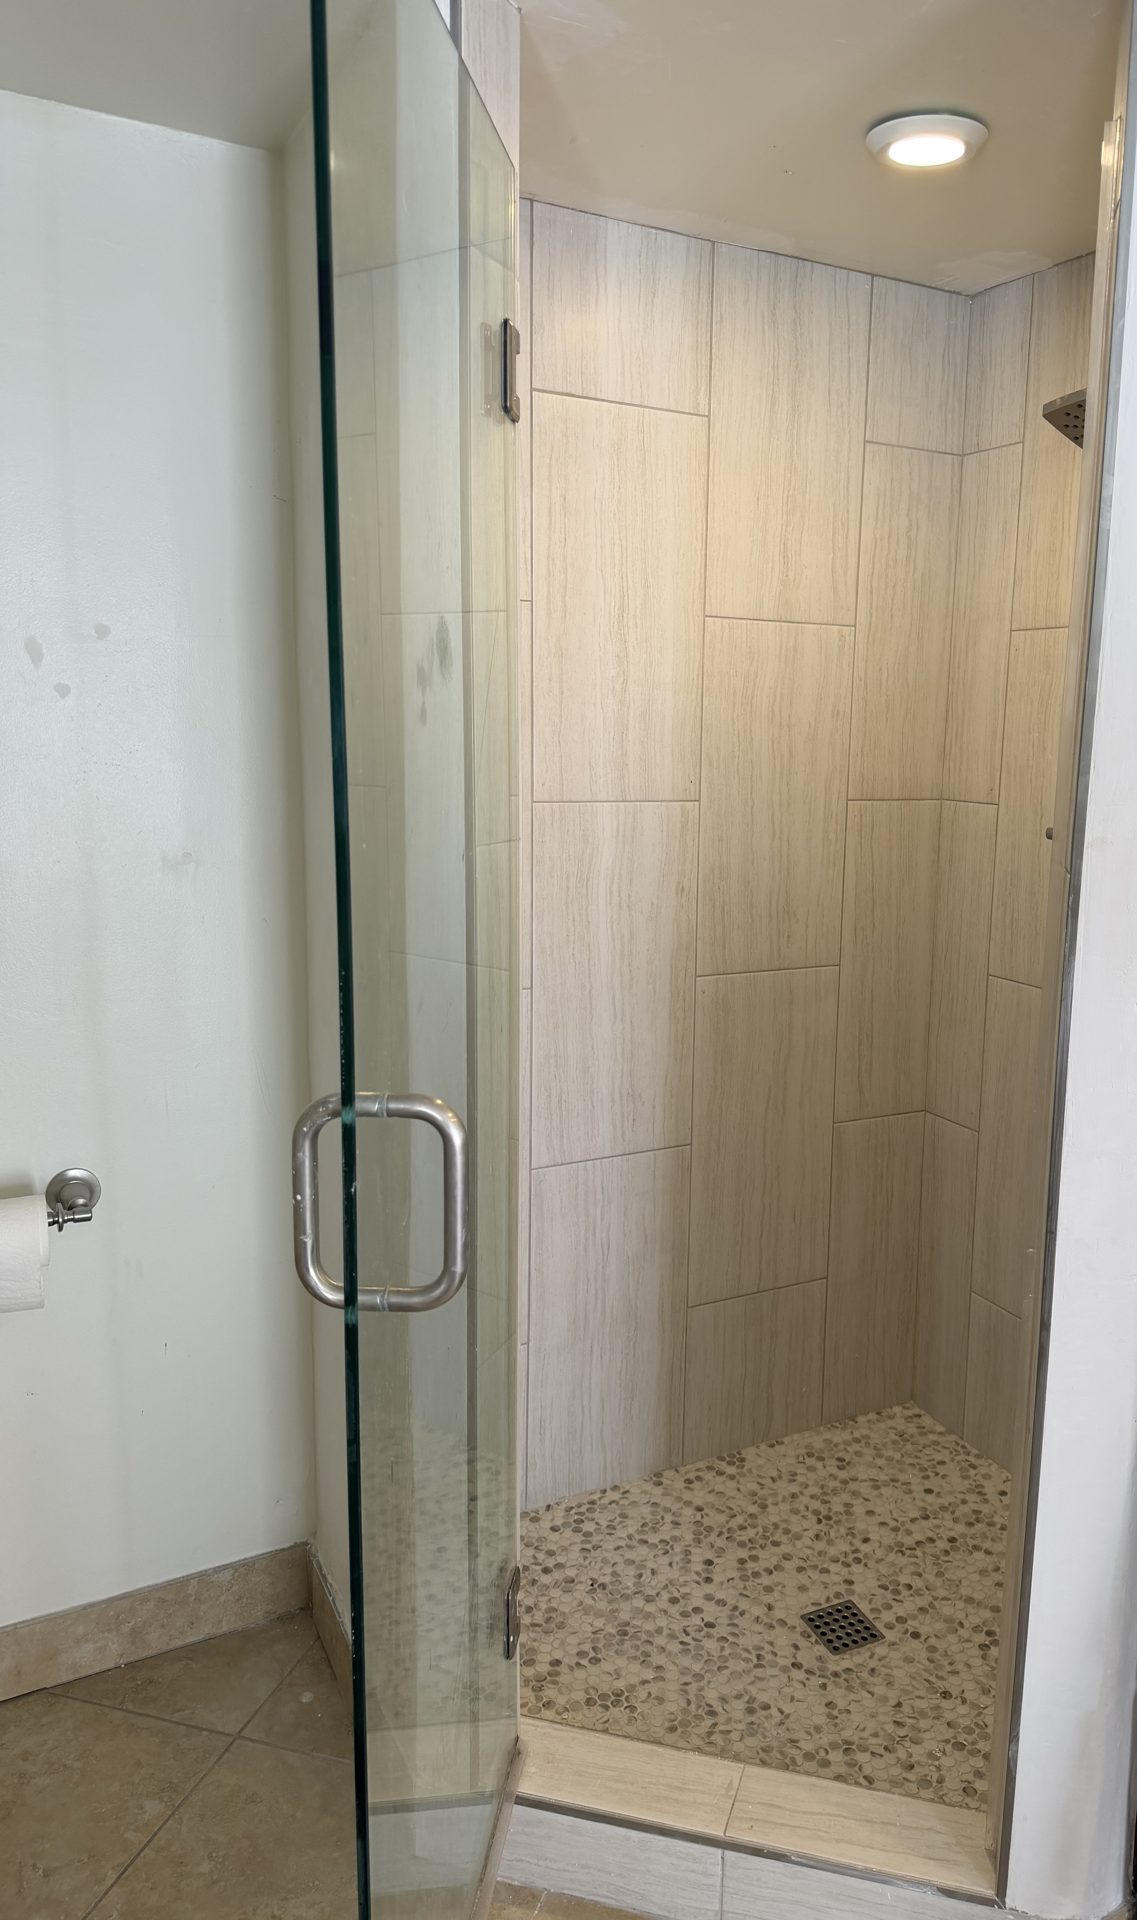
We rebuilt a master-bath shower in a McCormick Ranch home in Scottsdale, torn out to the slab and put back complete over 13 days, then repaired the wood floor the leak had reached once the shower was done. The homeowner's own plumber had already confirmed the pan was leaking. No matching tile existed, so nothing above the pan could be saved either, and a pan repair became a full tear-out.
Project at a Glance
- Area: McCormick Ranch, Scottsdale
- Shower: small corner stall in the master bath, single-person footprint, five-sided pan, curbed entry
- Starting point: failed pan, already diagnosed by the homeowner's plumber, with water in the drywall and into the next bathroom
- Scope: tear-out to the slab, new copper to a new mixing valve, mud-set pan on a PVC liner, masonry curb, new backer board, recessed niche, full re-tile, new frameless glass door
- Found after demo: rotted framing at the shower door, replaced at no charge
- Left alone: the bathroom floor tile, the vanity, the mirror and the cabinetry
- Calendar: 13 days door to door, about six or seven of them with a crew in the house
Why the wall tile could not be saved on this one
A leaking pan doesn't automatically mean the whole shower comes down. When the upper wall tile is sound and a match exists for the bottom course, the pan and that bottom row can be rebuilt underneath everything else. We have done exactly that, and the write-up is here: the shower where we saved the wall tile.
This one went the other way at the walkthrough. There was no matching tile to be had, so keeping the upper walls would have meant a visible seam of the wrong tile around the base of a small stall. Full re-tile was the call, and every decision after that followed from it.
What Demo Found Behind a McCormick Ranch Shower Wall
Demo took the tile, the old mortar bed and the wall board out in one pass. Poly sheeting went across the doorway and the perimeter got taped down first, because a mortar bed comes out as dust and there is no vacuuming that back out of the rest of the house afterward.
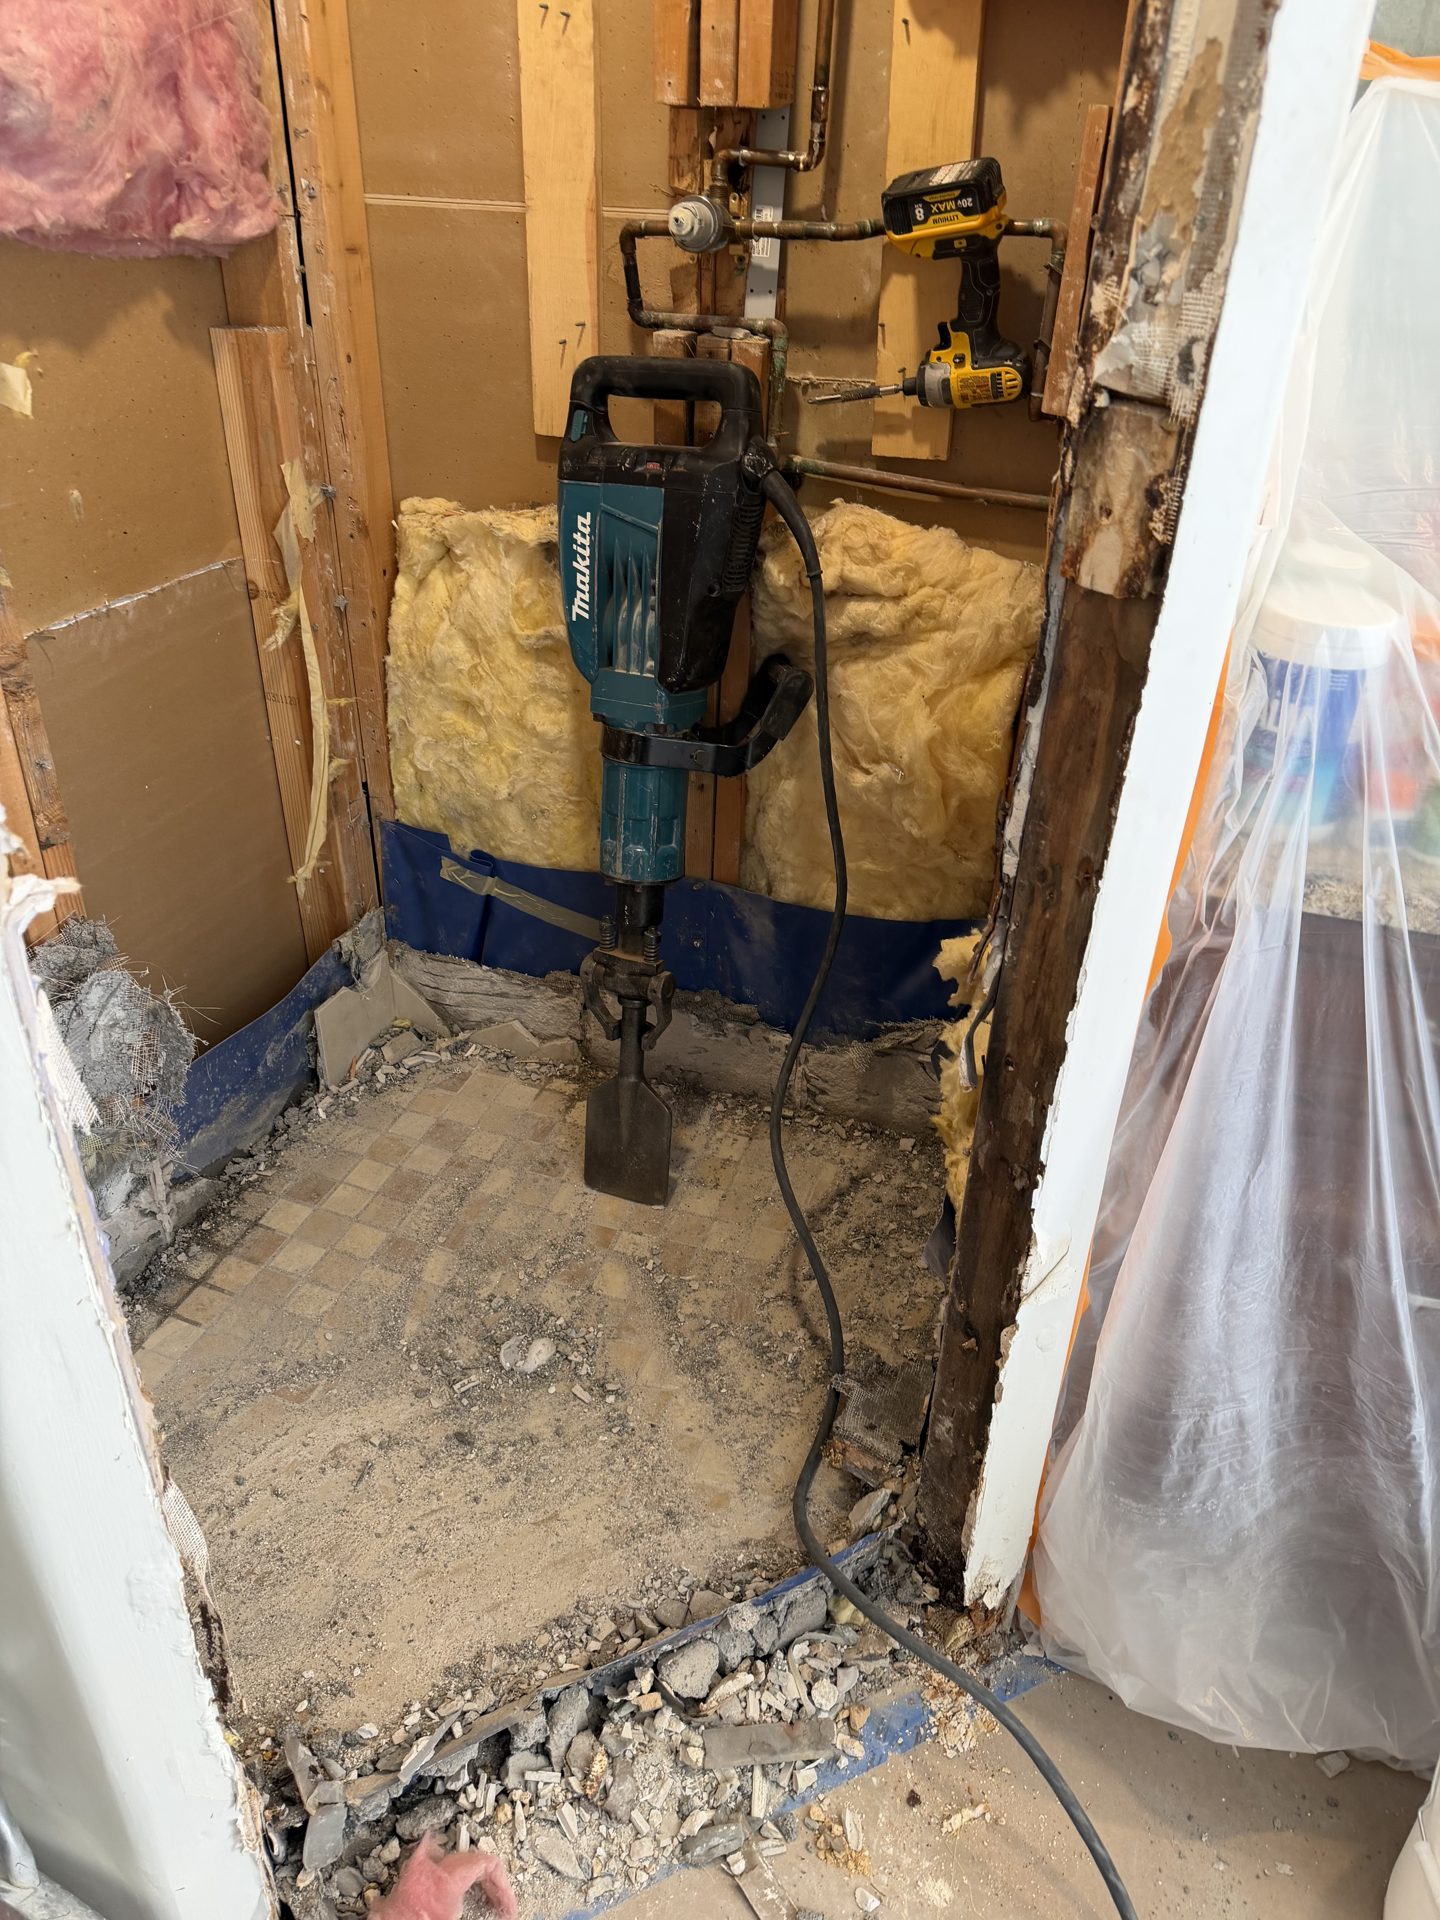
Underneath it was a bare concrete slab with the drain riser capped off. That detail matters more than it looks. McCormick Ranch is slab-on-grade, and on a slab a failed pan gives you none of the warnings people expect. There is no ceiling stain below and no soft spot in the floor. The water runs sideways under the bottom plates and surfaces as damp drywall in whatever room is next door, which is exactly what this homeowner had been seeing. That is why these leaks run for years in Valley houses before anyone connects the two.
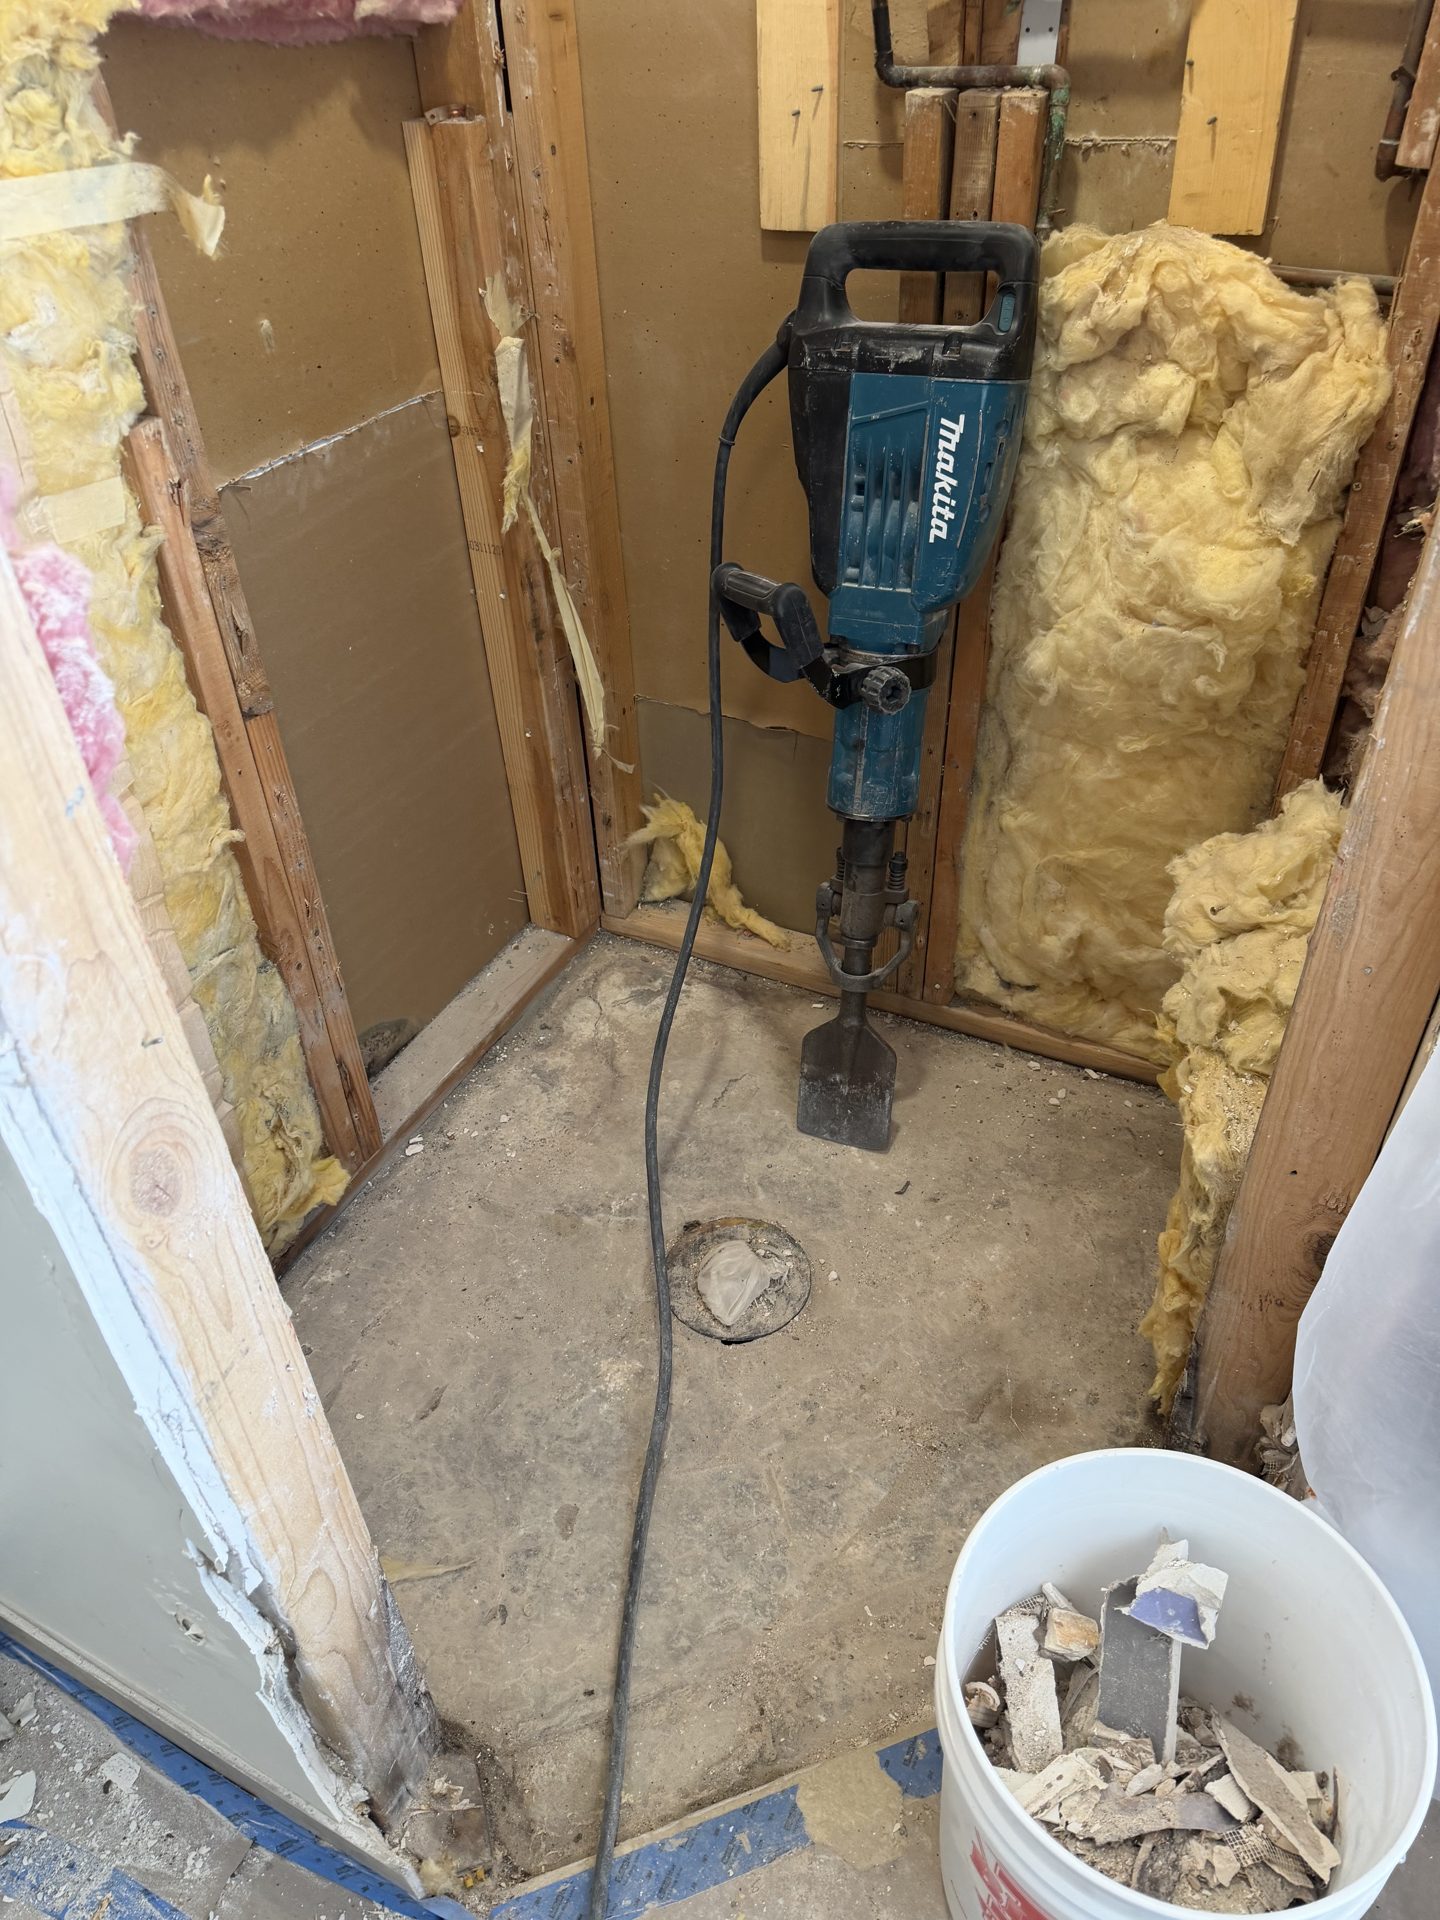
Rotted studs at the shower door, replaced at no charge
The framing at the shower door was rotted. We replaced the studs and did the extra drywall repair the replacement opened up around the doorway, and the contract price didn't move.
The location tells you something. Rot at the low outside corner by the door is the signature of a pan that was never draining properly, either laid flat with no slope under the liner or cut short at a corner. So is the fact that it rotted at all. Wood has to sit wet, and stay wet, before decay takes hold, and in an air-conditioned Phoenix house framing dries out fast between wettings. Decay needs sustained moisture, somewhere north of twenty percent moisture content and staying there, so getting framing to rot in this climate means it was being re-wetted essentially every day the shower was used, for long enough that no single wet season explains it. Persistently damp framing at slab level in a Valley house is worth a termite look while the wall is open.
Replacing studs in a wet wall is framing and structural repair, not tile work, and it is the sort of thing that turns up after demo rather than at the estimate. What shouldn't happen is finding out about it on the final invoice.
How is a mud-set shower pan actually built?
Nobody sees this part once the tile goes on, and it's the part that decides whether you're back here in five years. The pillar page covers how we rebuild a shower pan and what it costs in general. What follows is what this specific pan was, in build order.
Plumbing went first. New copper ran up to a new anti-scald mixing valve, the balanced-pressure type code asks for, carried on blocking set between the studs and tied into the existing lines further back. Before any mortar goes near it the valve gets a plaster guard, the black disc covering its face, and that does two jobs: it keeps mortar and thinset out of the cartridge, and its markings set how deep the valve sits so the trim plate lands flat on the finished tile later. Setting a valve at the wrong depth is a cheap mistake to make and an expensive one to fix once the wall is tiled.
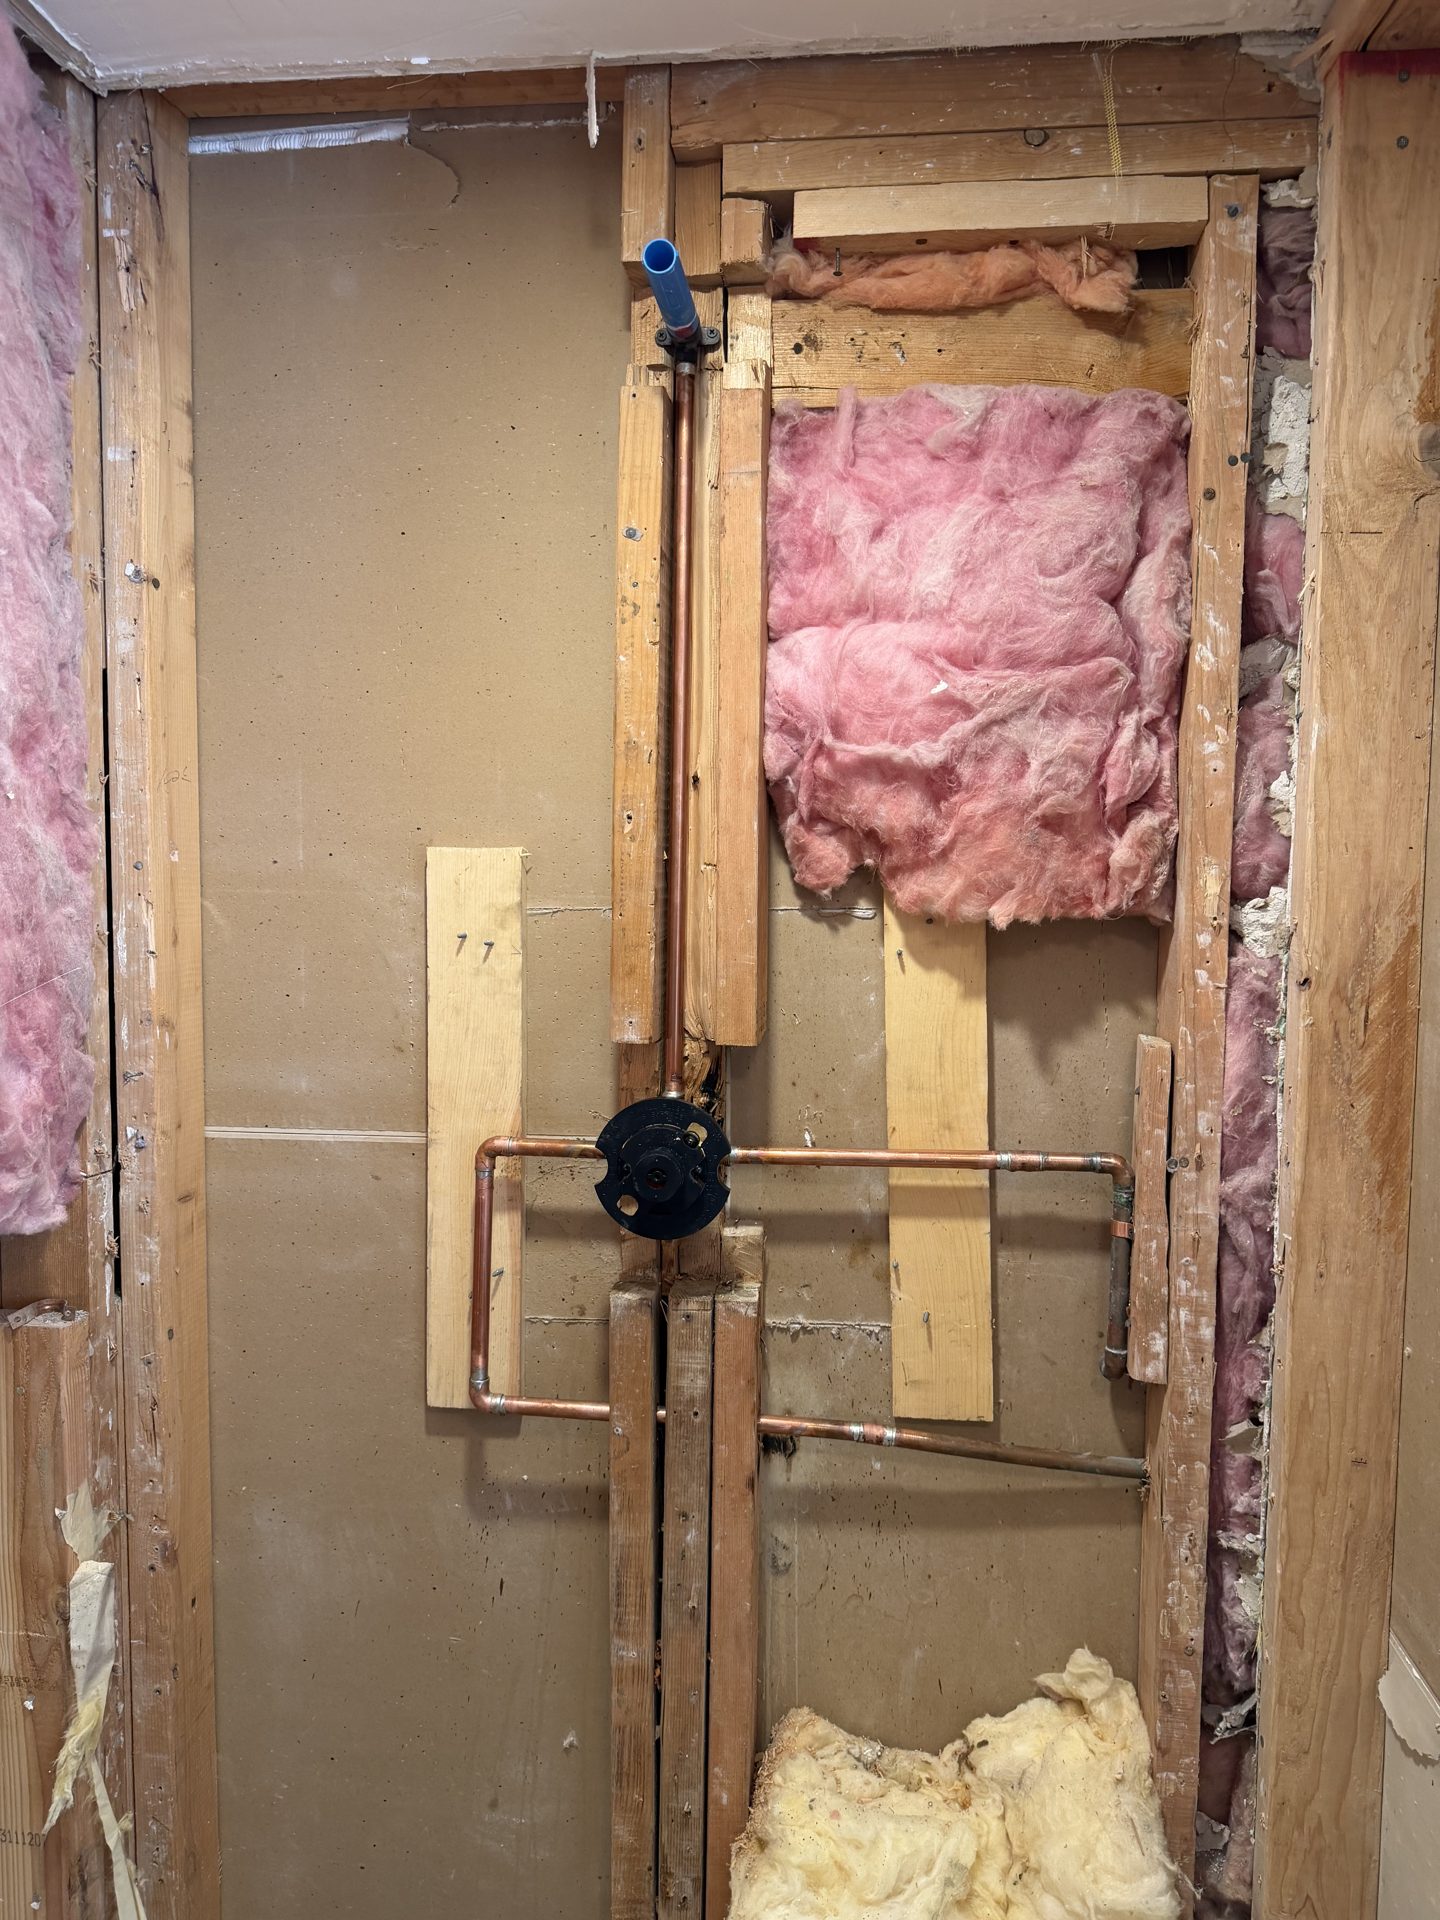
Then the drain body went in, seated flush with the slab, before any mortar. A shower drain of this type comes in three parts: the body, the clamping ring that sandwiches the liner watertight against it, and the strainer you see at the end. The body has weep holes in it, and those weep holes are the entire design intent. A traditional pan is not built to be watertight at the tile. It is built to let the small amount of water that gets through grout and stone find the liner, run downhill to the drain, and leave through the weeps. Pack those weeps with mortar and the bed never dries again.
Why the pre-slope goes in before the liner
With the drain body set, the first mortar bed goes down. This is the pre-slope, floated in deck mud, running downhill to the drain at a quarter inch per foot.
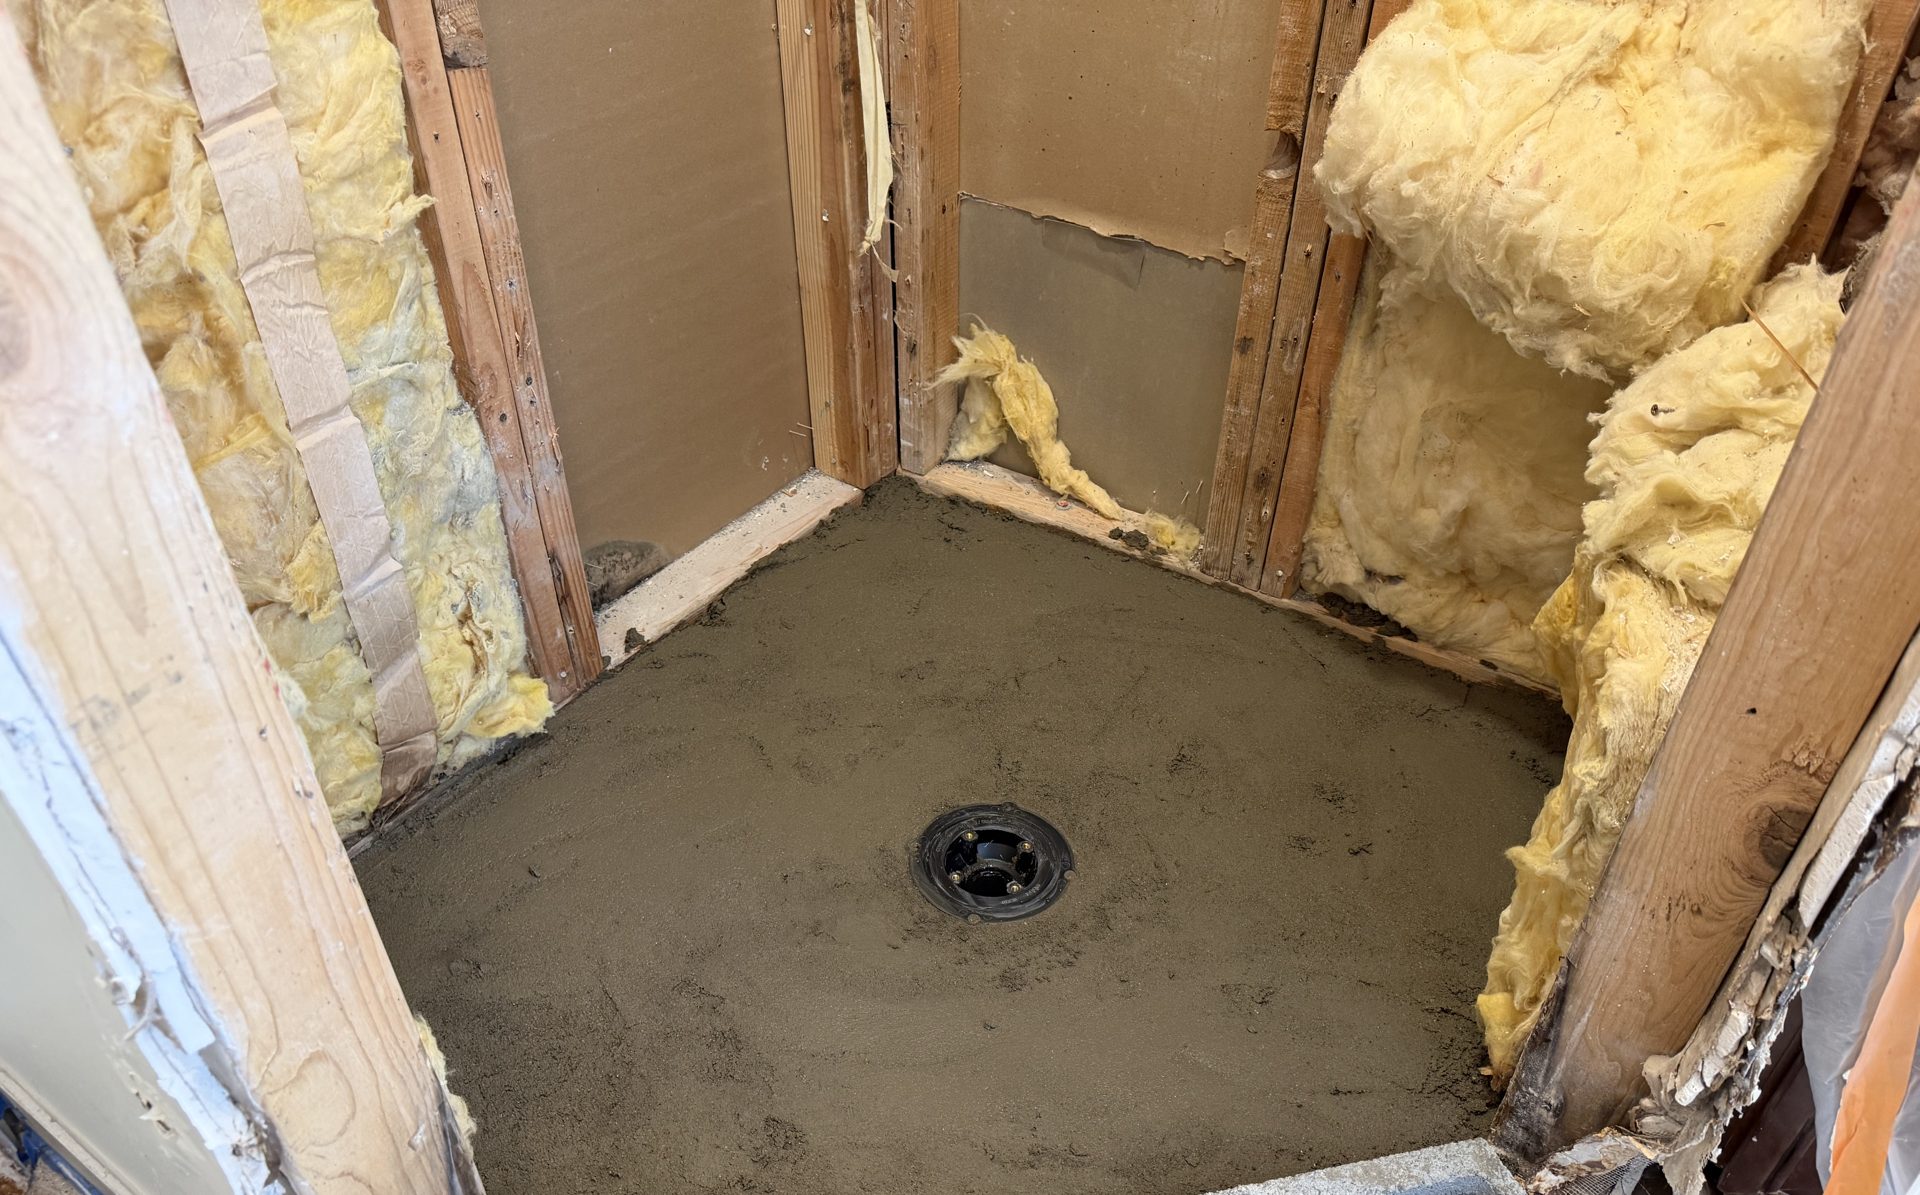
A mud pan has two slopes, not one. The liner is the waterproofing, so the liner is the surface that has to drain, which means the mortar under it has to be sloped before it goes down. The plumbing code Arizona builds to asks for a quarter inch per foot of fall under the lining, down to the weep holes. The only way that happens is if somebody floats a bed first.
Plenty of old Valley pans were built by laying the liner flat on the slab and sloping only the bed on top. It looks identical the day it is finished. Water then collects on a flat liner and sits there permanently, and the pan spends the next fifteen years slowly wetting whatever is around it. The order is what matters: drain body flush, pre-slope, liner, clamping ring, flood test, top bed. Ask any contractor to walk you through those six steps. What comes back tells you most of what you need to know.
The liner here is 40 mil PVC to ASTM D4551, the material the plumbing code names for this. It goes over the pre-slope, turns up the walls well above the threshold, and wraps over the curb in one continuous piece. The corners are folded and dammed rather than cut, because a cut corner is a hole, and it is one of the two most common ways this assembly fails.
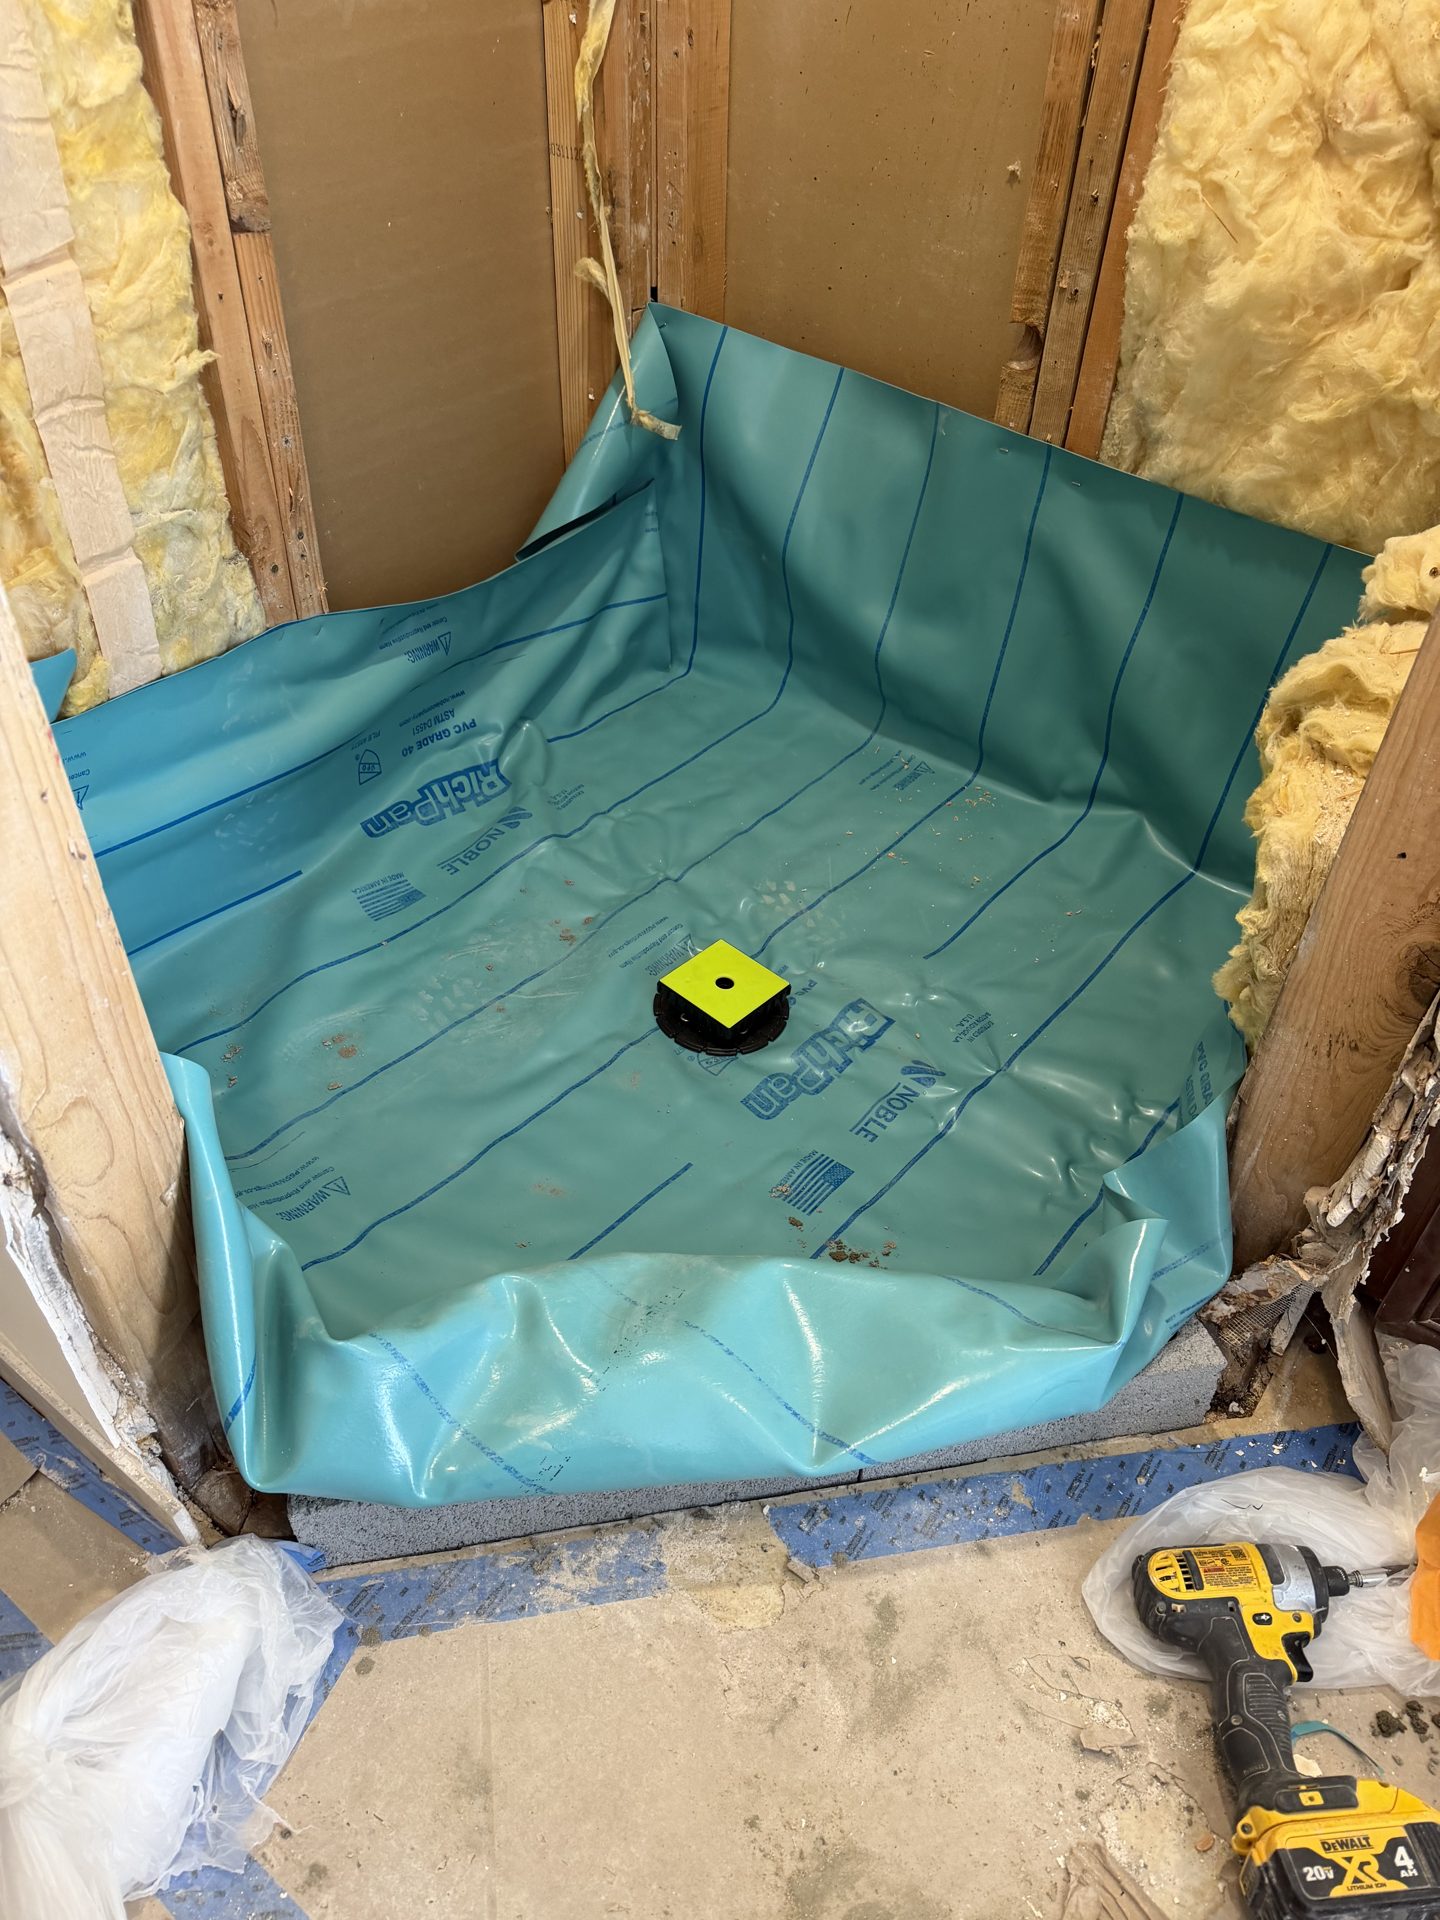
With the liner in and the clamping ring bolted down, the drain got plugged and the pan was flood tested before any mortar went over it. Standing water finds a flaw in a liner faster than any inspection does, and this one held.
The curb is masonry rather than the stack of three 2x4s that is the common alternative. There is a reason to prefer it beyond durability. Code will not let you nail or perforate that liner anywhere below an inch above the finished threshold, so a wood curb has to be built such that nothing is ever fastened through the wrong face. Plenty are built correctly. With solid masonry there is nothing to nail into down there in the first place.
What goes on the walls before the tile
The walls got a glass-mat tile backer, the kind with the moisture barrier built into the panel rather than applied over it. Then the joints, the corners, the penetrations and every fastener head were treated with RedGard, the liquid membrane you can see as the red in the photo.
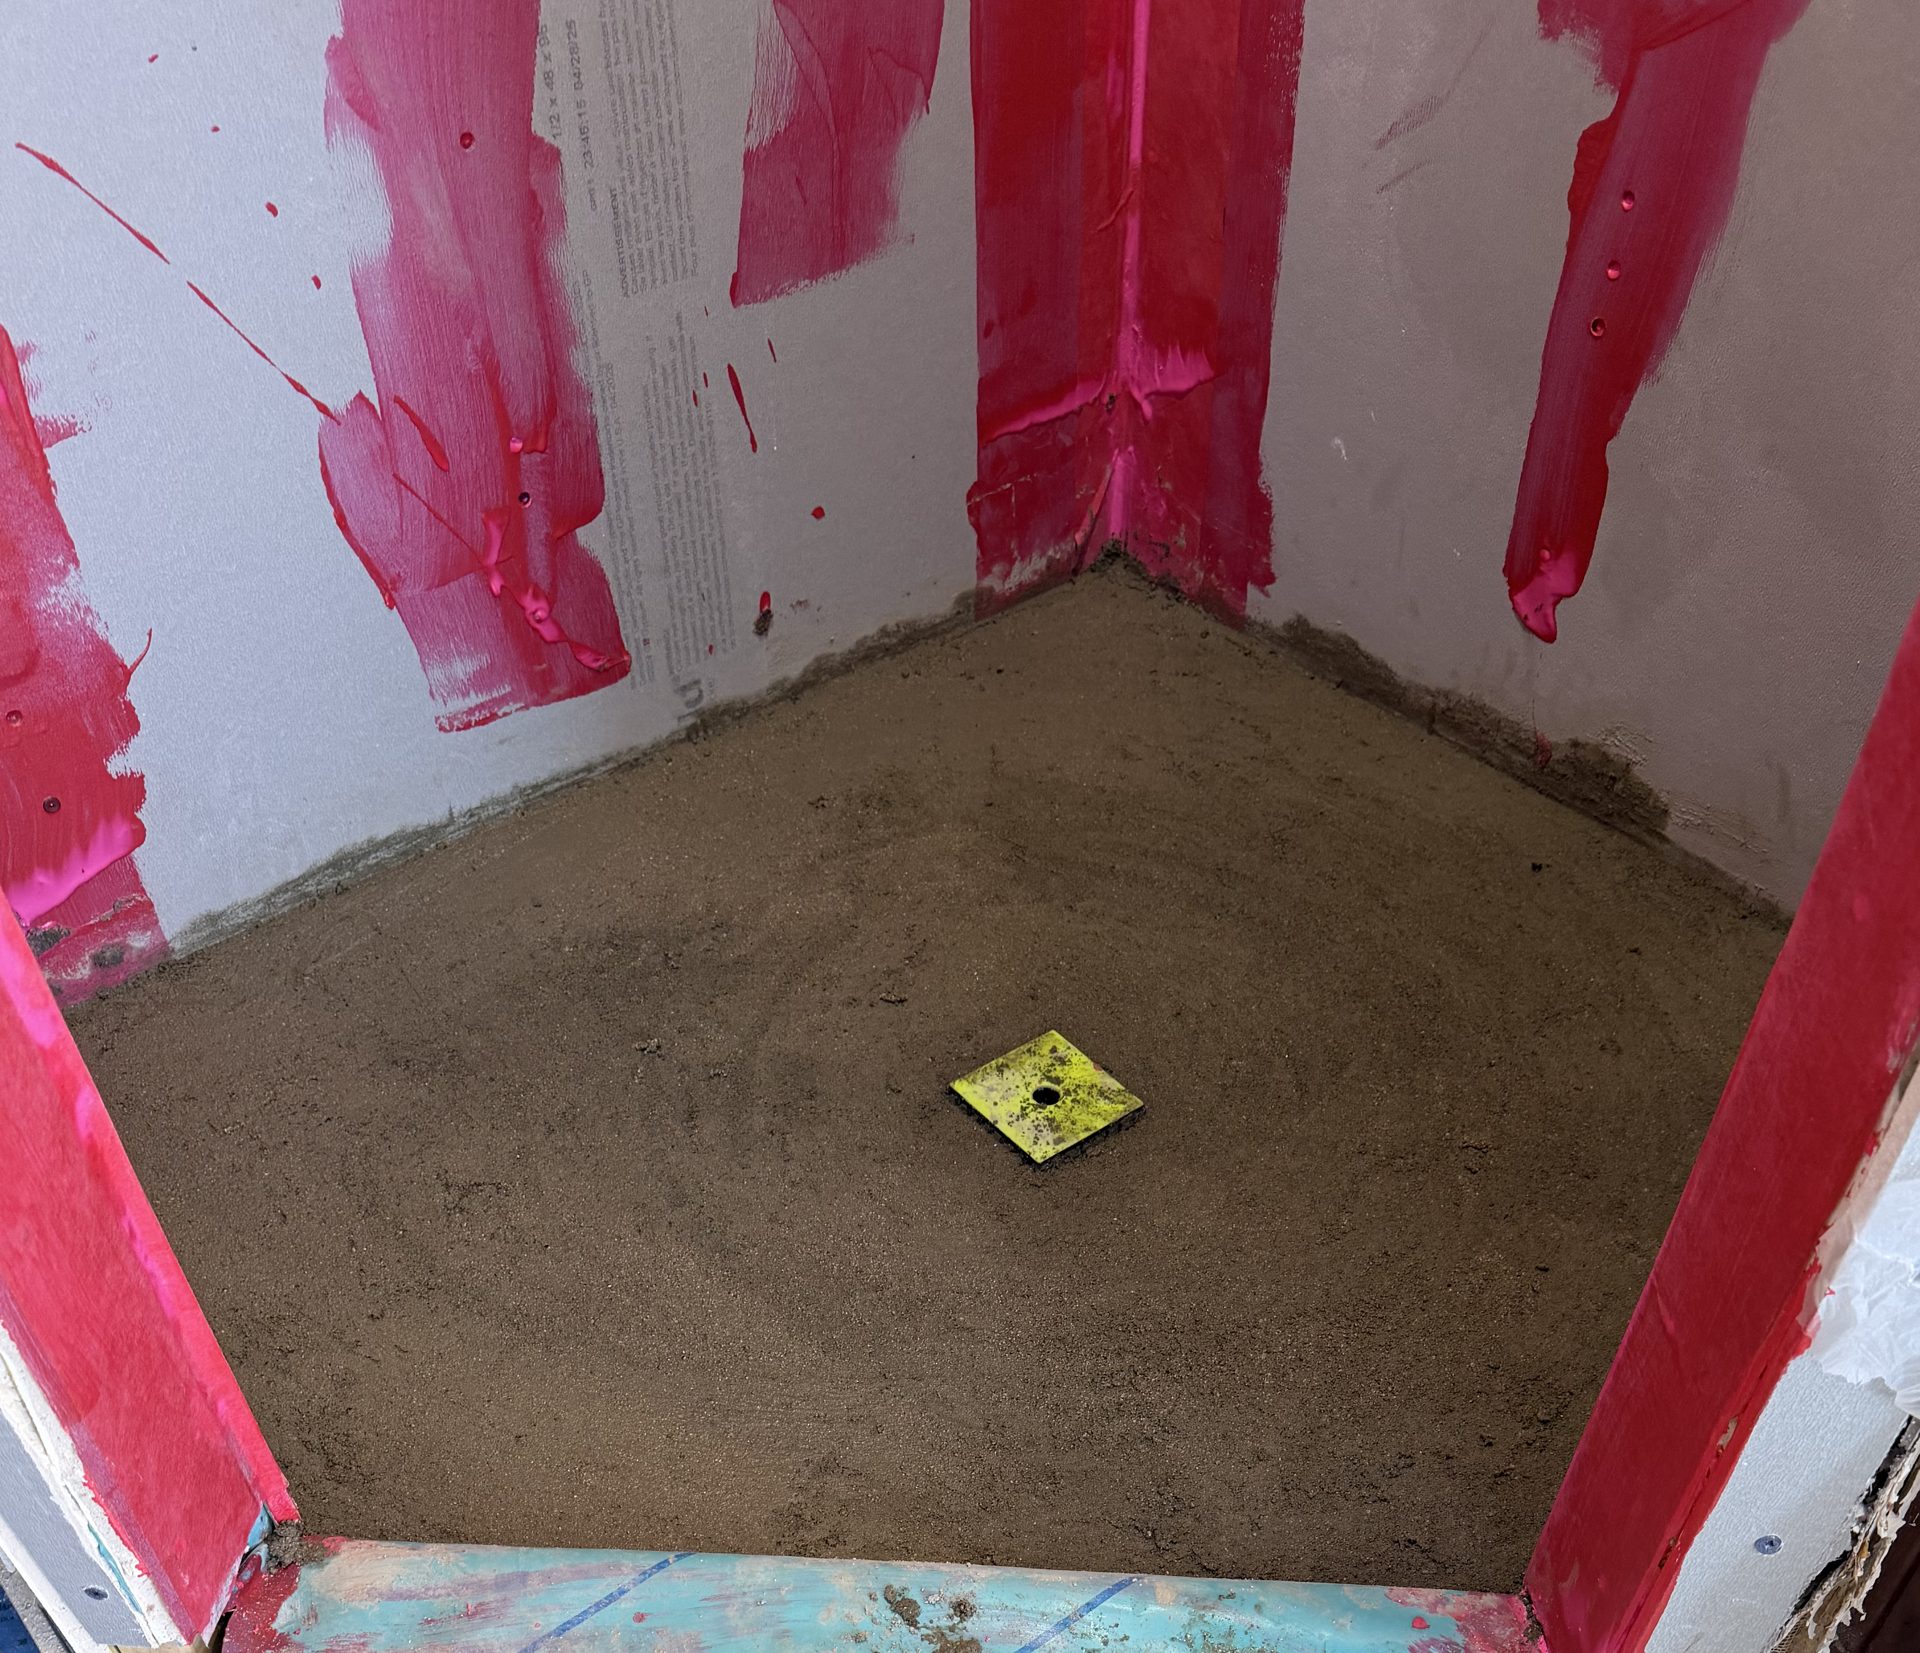
That is the manufacturer's own method for this board, and it is worth understanding why, because it looks like a shortcut if you assume every wall needs painting end to end. The barrier in this panel is continuous across the face already. What is not continuous is the line where two panels meet, the inside corner where they change direction, the hole cut for the valve and the shower arm, and every screw driven through the face. Those are the breaches. Treating them with a bonded membrane instead of a bead of sealant is a step up from the minimum, and the panel maker doesn't ask for a second full-coverage membrane over a board that is already a barrier.
The recessed niche went in at this stage as well, framed into the side wall and membraned around its opening before any tile went near it. A niche is a hole cut into a shower wall, so it either gets detailed properly while the wall is open or it becomes the leak.
The top mortar bed went down at the same stage, floated over the liner and the clamping ring and sloped to the drain, giving the pan its second slope.
Porcelain Plank Run Vertically Over a Penny-Round Pan
The walls are large-format porcelain plank with a fine linear grain, run vertically and offset only slightly from course to course. Both of those are deliberate. Vertical runs make a narrow single-person stall read taller than it is. The modest offset is a tiling rule rather than a style choice: plank tile is crowned slightly along its length, so a half-brick offset sets every tile's high point against its neighbor's low point and guarantees you can feel the edges. Once a plank gets long, the standard caps the offset at a third of its length unless the tile maker says otherwise, and these are well past that.
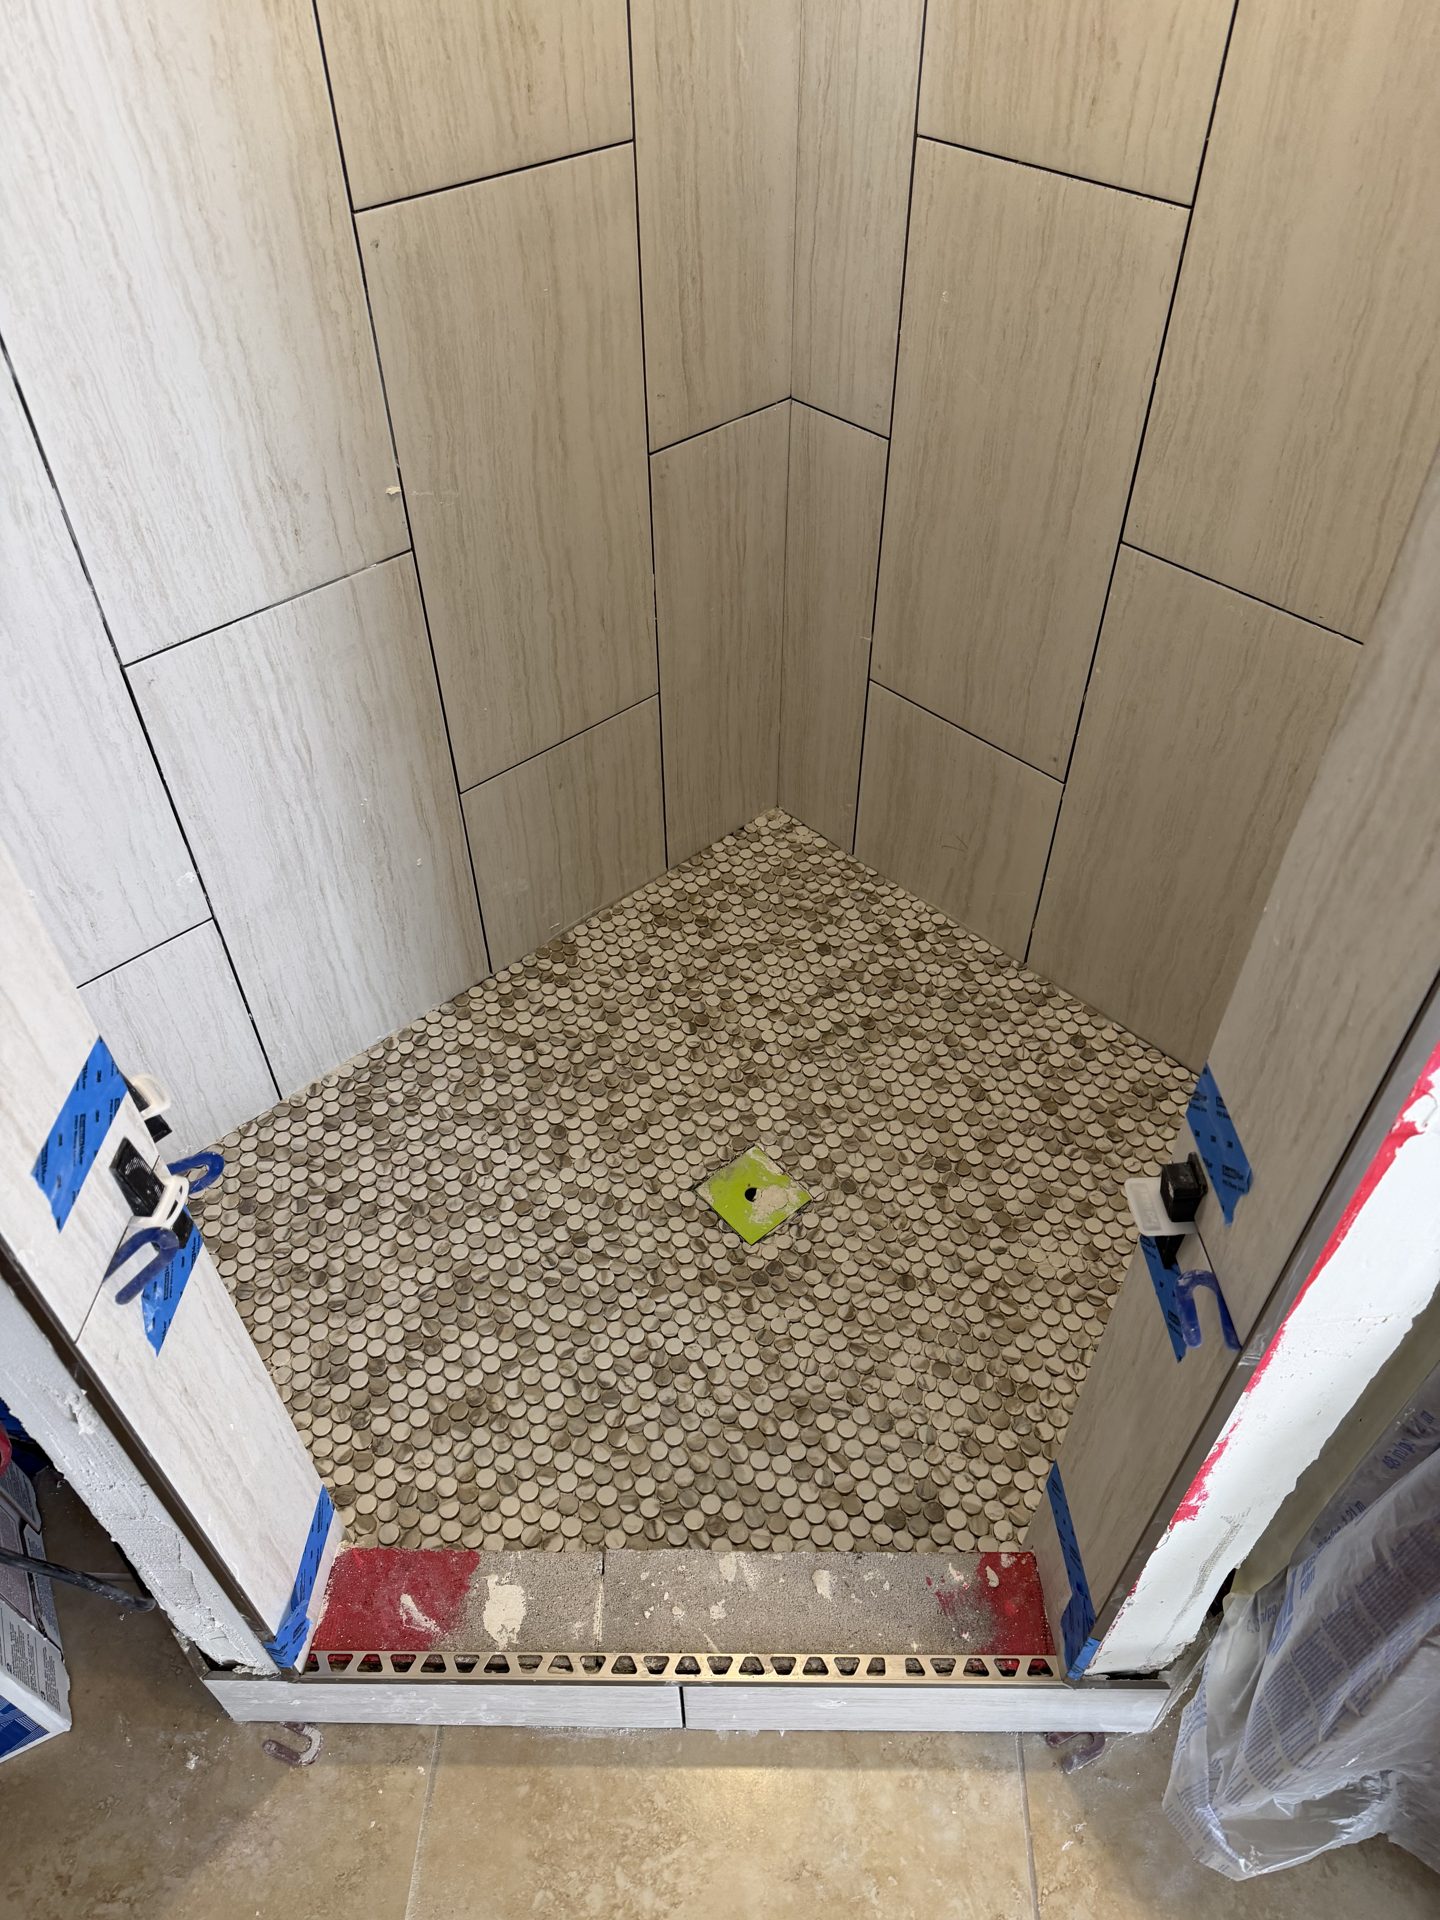
The pan gets penny round for the same practical reason. This is a five-sided corner receptor falling five directions into one center drain, and no large tile bends across a compound slope like that. A small mosaic on mesh follows it without lippage or pie-cut wedges. It also puts far more grout line per square foot underfoot, and grout line is traction. More grout line means more edges underfoot, which is why a mosaic is the default on a sloped pan you stand on wet. The number that actually governs is the tile's wet slip rating, and it is worth asking for it on any shower floor.
Every change of plane got silicone rather than grout. Wall to wall, wall to pan, and around the curb all move independently of each other, and cement grout in a moving joint cracks. Color-matched silicone in those three places is why a rebuilt shower does not start showing hairline cracks in year two. There are more finished bathrooms and showers in the project gallery.
How long does a full shower rebuild take, day by day?
Thirteen days door to door. The honest version of that number is about six or seven days of work with a crew in the house, two full weekends, and four separate waits that nobody can shorten.
The calendar ran like this. Walkthrough on a Wednesday, written quote the next day, signed the same day it was sent. On site the following Thursday, and the rot at the door turned up that same day. Friday took the plumbing rough-in, the drain, the pre-slope, the curb and the liner, and the pan sat under a flood test before the top bed went over it. Backer board, membrane and the top bed on Monday. Tile on Thursday. Grout at the end of that week. Glass on the following Monday, then trim-out on Tuesday: shower head, valve trim, light and the toilet reset.
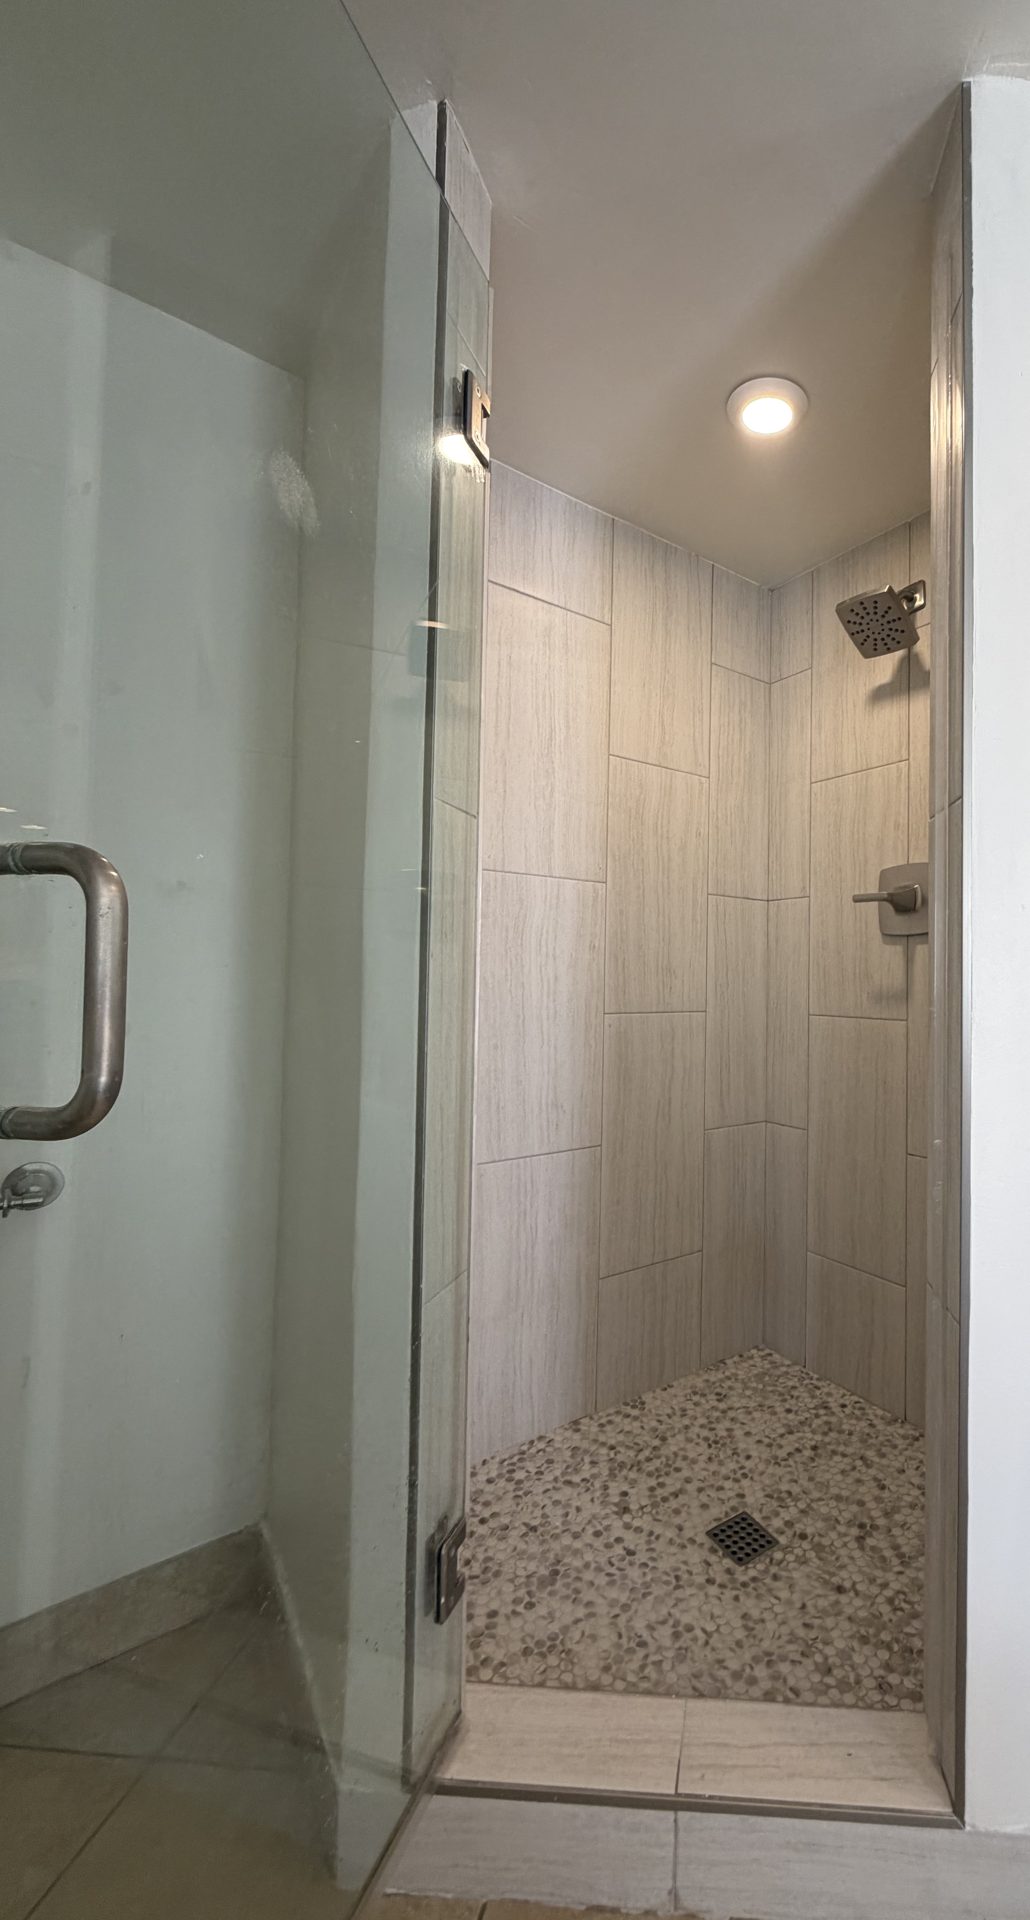
The gaps in that list are the point. The top bed has to set before anyone tiles on it. Thinset needs a day before grout goes in, and longer is safer under large-format porcelain, where the only way the moisture under a tile can escape is through the joints. Grout and silicone need a day or two before water hits them. And frameless glass can't even be measured until the tile is set, because tempered glass can't be cut or drilled after it is tempered, so a quarter inch of tile thickness changes the panel. Nothing in an older house is square, so the shop templates off the tile that is actually there, and the door went in the following Monday.
Add those waits to the fabrication time for the glass and two weekends, and thirteen days is a tight schedule rather than a slow one. The homeowner is back in the shower a day or two after the grout and silicone go in. This one was a rebuild in the existing footprint with the drain and fixture locations unchanged, and it was handled without a permit. Permit rules differ by city and by scope across the Valley, so we confirm it with the jurisdiction before starting rather than assuming.
One local scheduling note: August is a good month for this work. Exterior paint, flatwork and fencing all fight 110-degree surfaces and monsoon shutdowns in a Phoenix summer. A bathroom doesn't care what the weather is doing.
Has a Plumber Told You Your Pan Is Leaking?
Send us photos of the shower, the corner where it is failing, and any staining on the wall outside it. We will tell you whether the pan and the bottom row can be rebuilt underneath your existing tile or whether it has to come out, and what each version costs. Free estimate, licensed Arizona contractor, ROC #365090.
Get a Free EstimateFrequently Asked Questions
Will homeowners insurance pay to rebuild a shower after the pan fails?
Usually not the shower itself. Most policies draw a line between sudden accidental damage, which is often covered, and gradual seepage over a long period, which is almost always excluded as wear and tear. A pan that has been weeping into the wall for years falls on the excluded side, and the failed component is generally treated as the thing you were supposed to maintain. What sometimes does get covered is resulting damage elsewhere, such as flooring or drywall in an adjoining room. Call your carrier before the demo starts and ask them to tell you in writing which parts they will look at, because once the wall is closed up the evidence is gone.
Can we still use the bathroom while the shower is being rebuilt?
On this job the toilet came out for part of the work and went back in at the end, and the vanity stayed usable throughout. That is the normal pattern for a single-stall rebuild. The shower is out of service from the first day of demo until the grout and silicone have cured, so plan on another bathroom for showering for about two weeks. We sheet off the doorway and tape the perimeter to keep mortar dust out of the rest of the house, which also means the room is closed while the crew is working in it.
What happens to the price if you find rot or water damage behind the wall?
It depends on the size of what turns up, and you should get told the same day it is found rather than at the end. On this job the framing at the shower door was rotted. We replaced the studs and did the extra drywall repair around the opening, and the contract price didn't move. Something larger, such as a rotted bottom plate running the length of a wall, or damage that has tracked past the bathroom, is a change order with its own number in writing before anyone touches it. What should never happen is a surprise on the final invoice.
Is a one-day acrylic shower liner cheaper than rebuilding the tile shower?
Cheaper up front, yes, and for the wrong problem it is a reasonable product. The catch is what a liner does with a failed pan. An acrylic liner is fitted over the surface you already have, so if the waterproofing underneath has failed and the framing is wet, the liner covers all of it and the leak keeps running out of sight. Rot at the studs is exactly the condition that rules it out. If your pan is intact and you simply dislike the tile, a liner or a refinish is worth pricing. If a plumber has confirmed the pan is leaking, the assembly under the tile has to come out.
How long should a properly rebuilt shower pan last before it needs this again?
Decades. A liner pan built with a real pre-slope and folded corners routinely runs 20 to 30 years or more, and plenty of Valley showers go longer than that. What shortens it is almost never the material. It is a liner laid flat with no slope under it, a corner cut instead of folded, a fastener driven through the turn-up, or weep holes packed with mortar so the bed can never dry. Those are all decisions made in a single afternoon that determine whether the pan lasts five years or thirty. Grout and silicone are maintenance items on top of that, and re-siliconing the corners every few years is normal.
The cheapest two weeks this bathroom will ever have
A shower rebuild is unusual among home repairs in that the expensive part is access. For roughly two weeks there is containment up, a crew in the house, mortar and thinset being mixed, a toilet already pulled and a wall already open to the studs. Anything that rides along on that setup costs a fraction of what it costs as its own trip, commonly 25 to 50 percent less. The catch is that you have to raise it before the work starts, not after the tile is on.
- Swap the toilet while it is already off the flange. Pulling and resetting a toilet is most of the labor in replacing one, and on a rebuild like this it happens anyway. An older builder-grade toilet traded for a modern comfort-height unit is one of the cheapest visible upgrades available at this moment, and it will never be this cheap again.
- Deal with the exhaust fan. Code asks a bathroom for 50 cfm of intermittent exhaust, or 20 running continuously. An older fan that has never been cleaned, or one venting into a sagging flex duct, is usually not moving what its label says, and a bathroom that can't clear its own moisture is working against the shower you just paid to rebuild. Getting at it is electrical and fixture work and it is a short job while the room is already a job site.
- Get the rest of the drywall texture matched at the same time. The perimeter repair around the shower door had to be textured back to match the existing walls, and matching Valley texture is a real skill that is annoying to buy in small quantities. Stress cracks, old anchor holes and past-leak stains elsewhere in the house draw on the same mud, tape and sanding setup. Pricing is on the drywall repair page.
- Sort out any floor that the leak reached. That is what the change order on this job was. Water that has tracked under a bottom plate rarely stops at the bathroom door, and the boards it reached are easier to deal with while a crew is on site with the tools out. See flooring repair and installation.
- Hand over the small stuff you have been ignoring. Doors that stick, a loose railing, a light that was never hung. Those are half-hour items that cost mostly in showing up, and showing up is already paid for. That is what our punch list service is for.
Ask for a bundled price while the scope is still being written. And if the list keeps growing past the bathroom door, that is a different conversation, one our bathroom remodeling page covers end to end. Once the containment comes down and the glass is in, every one of these turns back into its own visit with its own drive time.

Written by Harrison Norem. Licensed Class B General Contractor, AZ ROC #365090. About Harrison